Installing Pi-hole on Raspberry Pi Zero 2W: Blocking Ads and Telemetry with a RPi!
Updated: 26 Jul 2026. Jump to updates.
If you’ve ever felt like you’re being watched online, well, you probably are. Ads, trackers, and all that “helpful” telemetry lurk behind every webpage and app. Online advertising and telemetry have become an unavoidable part of daily browsing and device use. Nearly every website and app now tracks your activity and serves ads (not this one…), often at the expense of your privacy and network performance. Fortunately, there are practical solutions to minimize or block these unwanted intrusions for your entire home network.
Pi-hole is a popular network-wide ad blocker that works as a DNS sinkhole, blocking requests to advertisement and tracking domains before they load. All it takes is a low-powered device, like a Raspberry Pi, to set up your own Pi-hole server. While any Raspberry Pi model will work for this project, the Raspberry Pi Zero 2W, with an ethernet hat and suitable case, is particularly appealing for its compact size and quiet operation. For a standalone Pi-hole setup, larger and more powerful models are generally unnecessary.
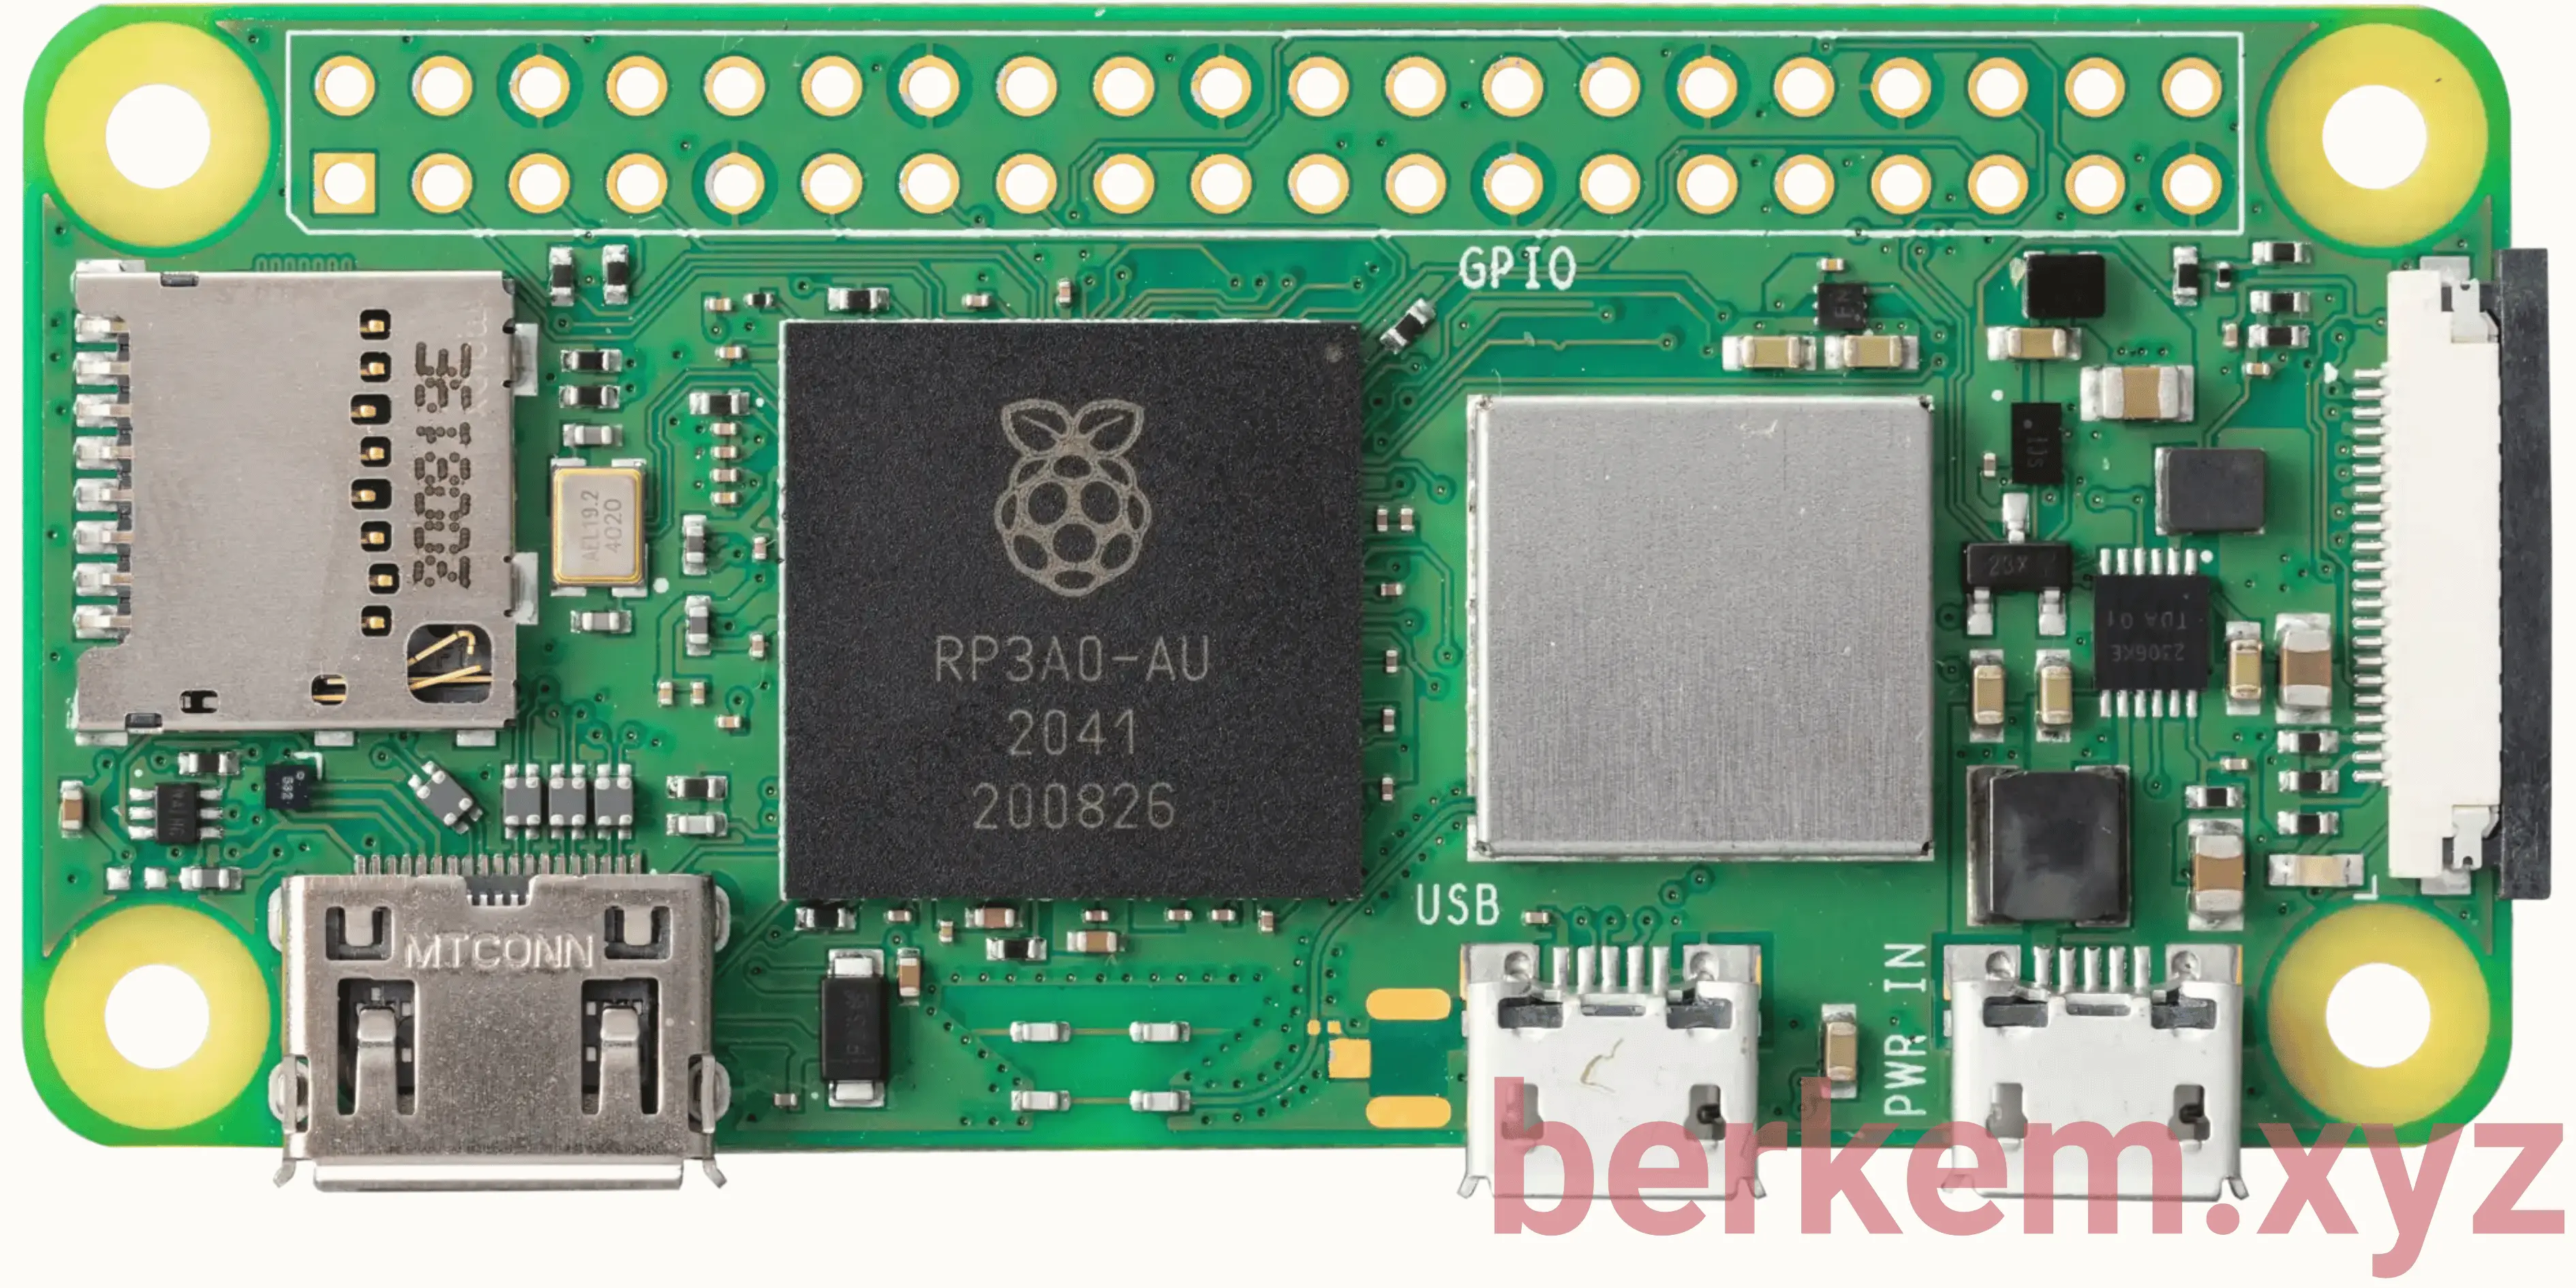
I prefer to run Pi-hole on a dedicated Raspberry Pi, especially because I also use it as my network’s DHCP server. This setup separates Pi-hole from other experiments or services, increases reliability, and makes network management more straightforward.
In this guide, I’ll show you how to install and configure Pi-hole on a Raspberry Pi Zero 2W, optimize your Pi-hole setup, and help your entire network benefit from faster browsing and stronger privacy.
Before we dive in, make sure to grab a quality SD card (don’t cheap out or you’ll regret it when it fails), and find a spot for your Pi that’s near your router. Ethernet is king here, trust me, wireless can be flaky, and Pi Zero’s WiFi is nothing to brag about.
No fluff, no drama, and no telling my life story before the recipe 🤷🏻♂️
Let’s do this.
Table of contents
- What you need
- Flashing the Raspberry Pi OS
- Getting the Pi on your network
- Installing Pi-hole
- DHCP and network configuration
- Supercharge your blocklists
- Testing and monitoring
- Can a Pi Zero 2W handle a whole household?
- Keeping Pi-hole updated and healthy
- Troubleshooting the usual suspects
- Frequently asked questions
- Conclusion
- What changed in this update
Step 1: What You Need
- Raspberry Pi Zero 2W (or really, any RPi you have handy)
- Ethernet hat/case (for a stable connection)
- High-quality microSD card (16GB+ is fine; beware cheap no-name brands)
- Power supply (Try to use official one, this device will be working 24/7)
- Router access (To tie things together)
- Optional: Monitor and keyboard (but SSH is way easier)
Pro-tip: SD cards have a lifespan. Set reminders for periodic backups or image clones. Future you will thank you (or me).
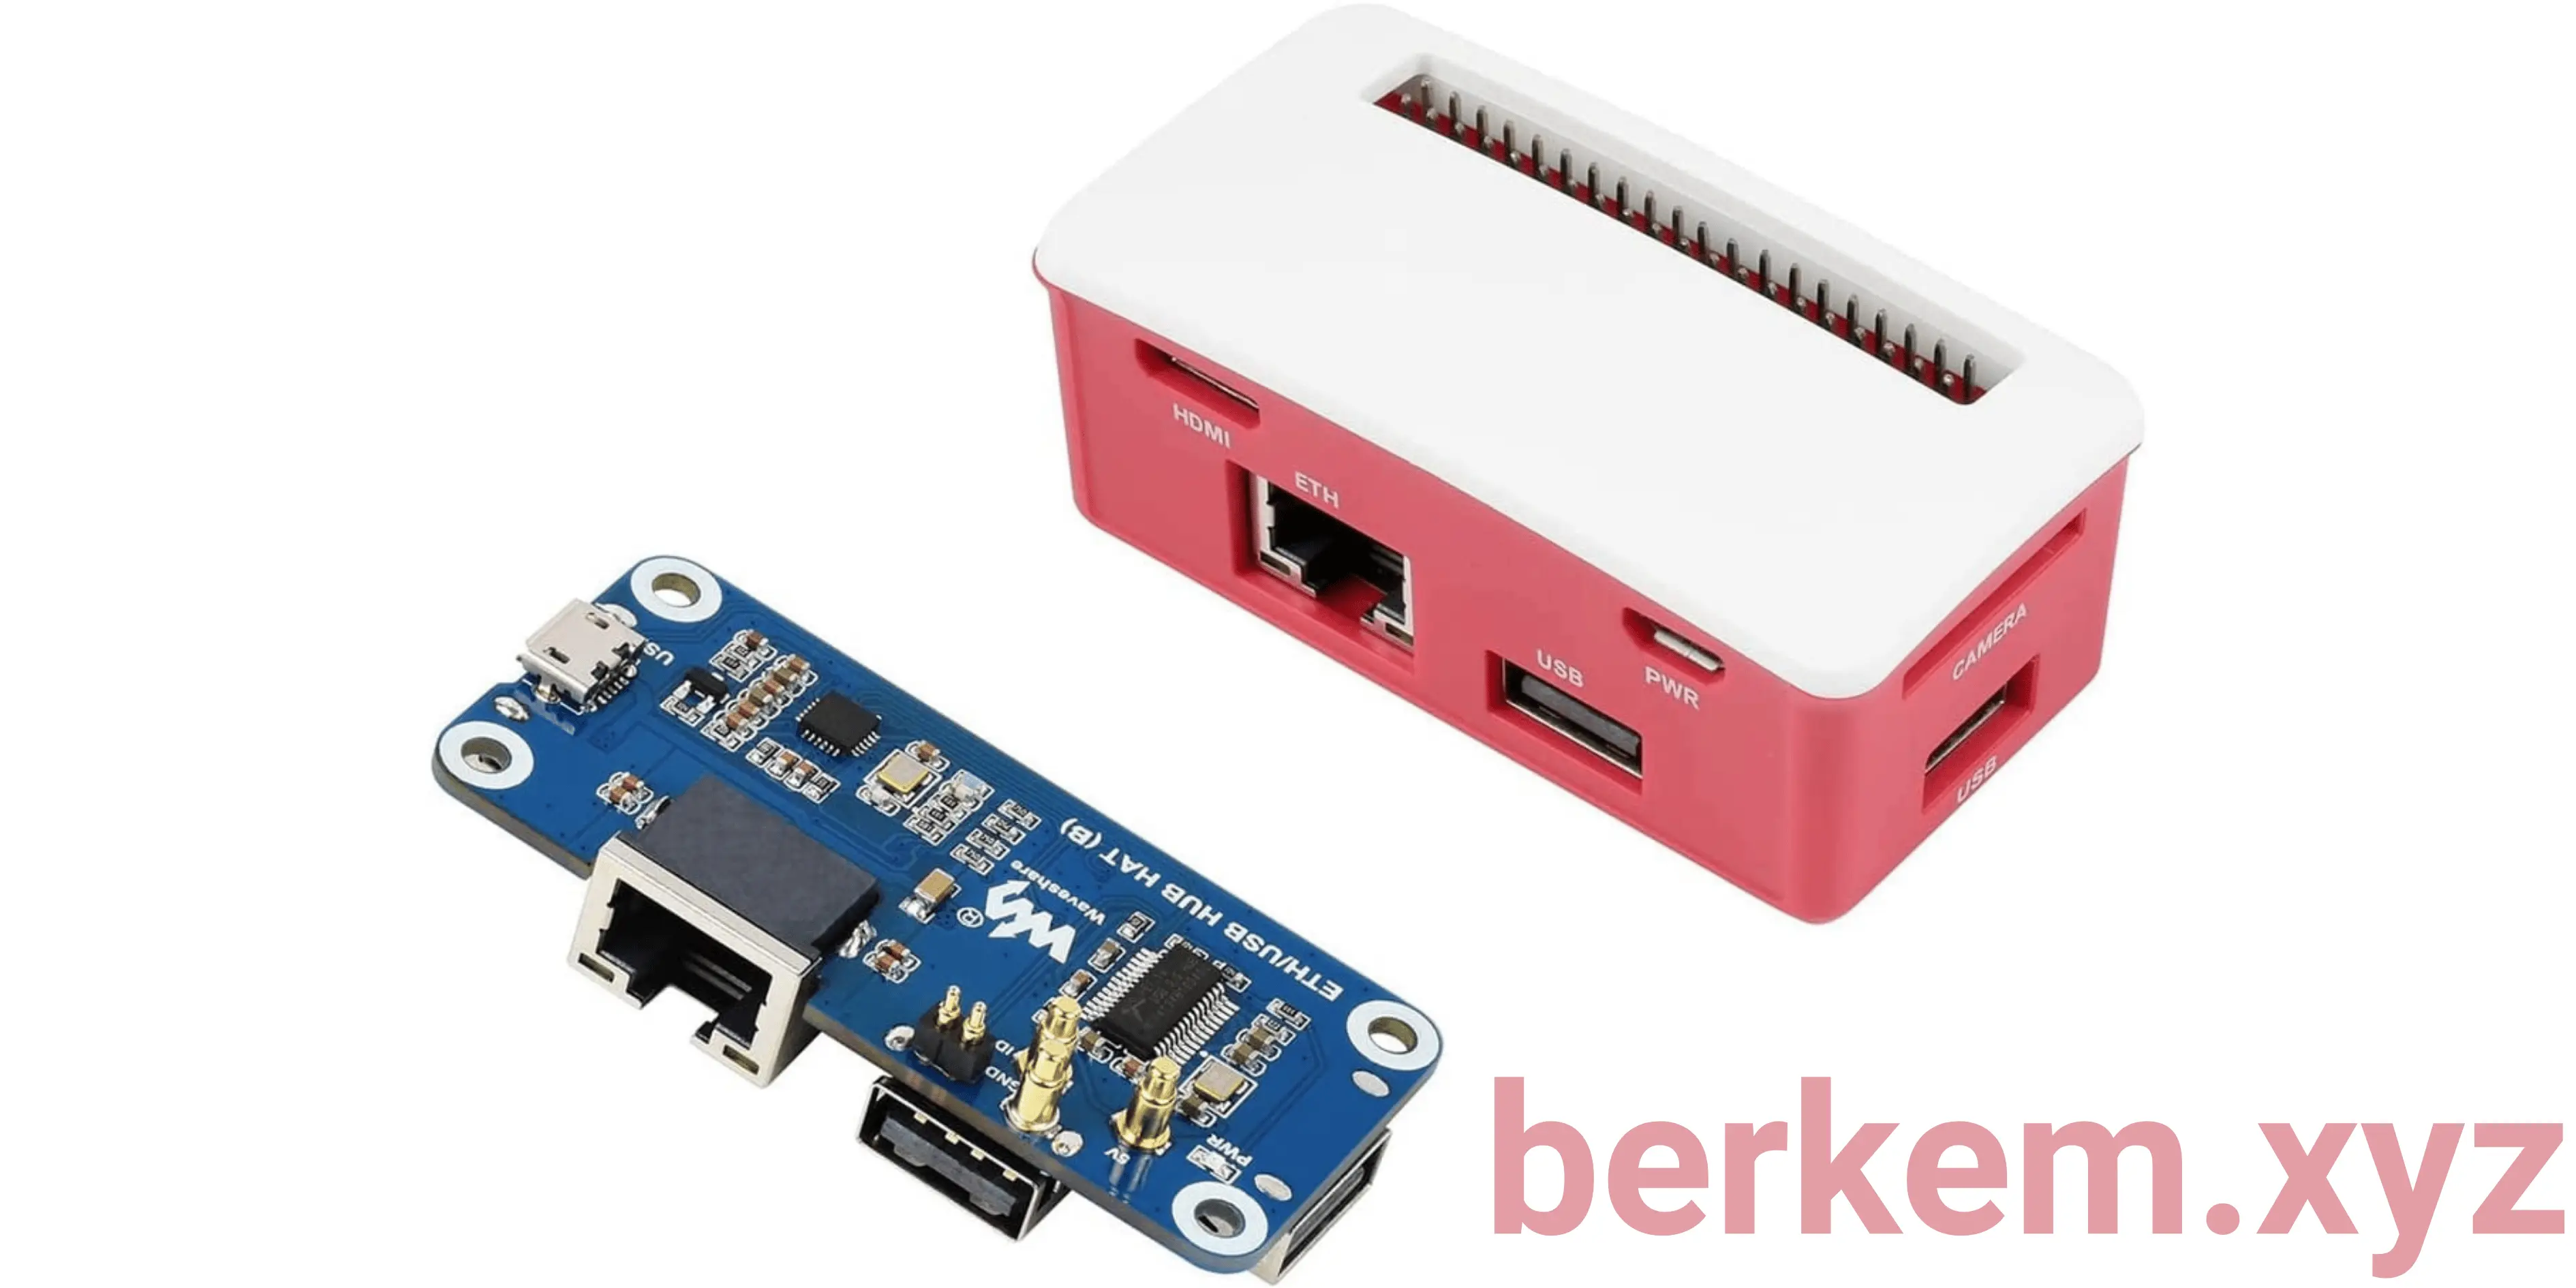
Does this work on other Raspberry Pi models? Yes, all of it. Every command below is identical on a Pi 3, Pi 4, Pi 5, a Zero W, or a Compute Module, because the Pi-hole installer only cares that you’re running a supported 64-bit OS. Officially Pi-hole wants 512 MB of RAM and 2 GB of free disk (4 GB recommended), and literally every Pi meeting that bar will do. I picked the Zero 2W because it’s the smallest thing that comfortably clears it, and because a dedicated box that does one job well beats a busy box that does five jobs badly. If you want the busy box instead, I wrote about that too in my Raspberry Pi homelab projects guide.
Step 2: Flashing the Raspberry Pi OS
-
Download Raspberry Pi Imager
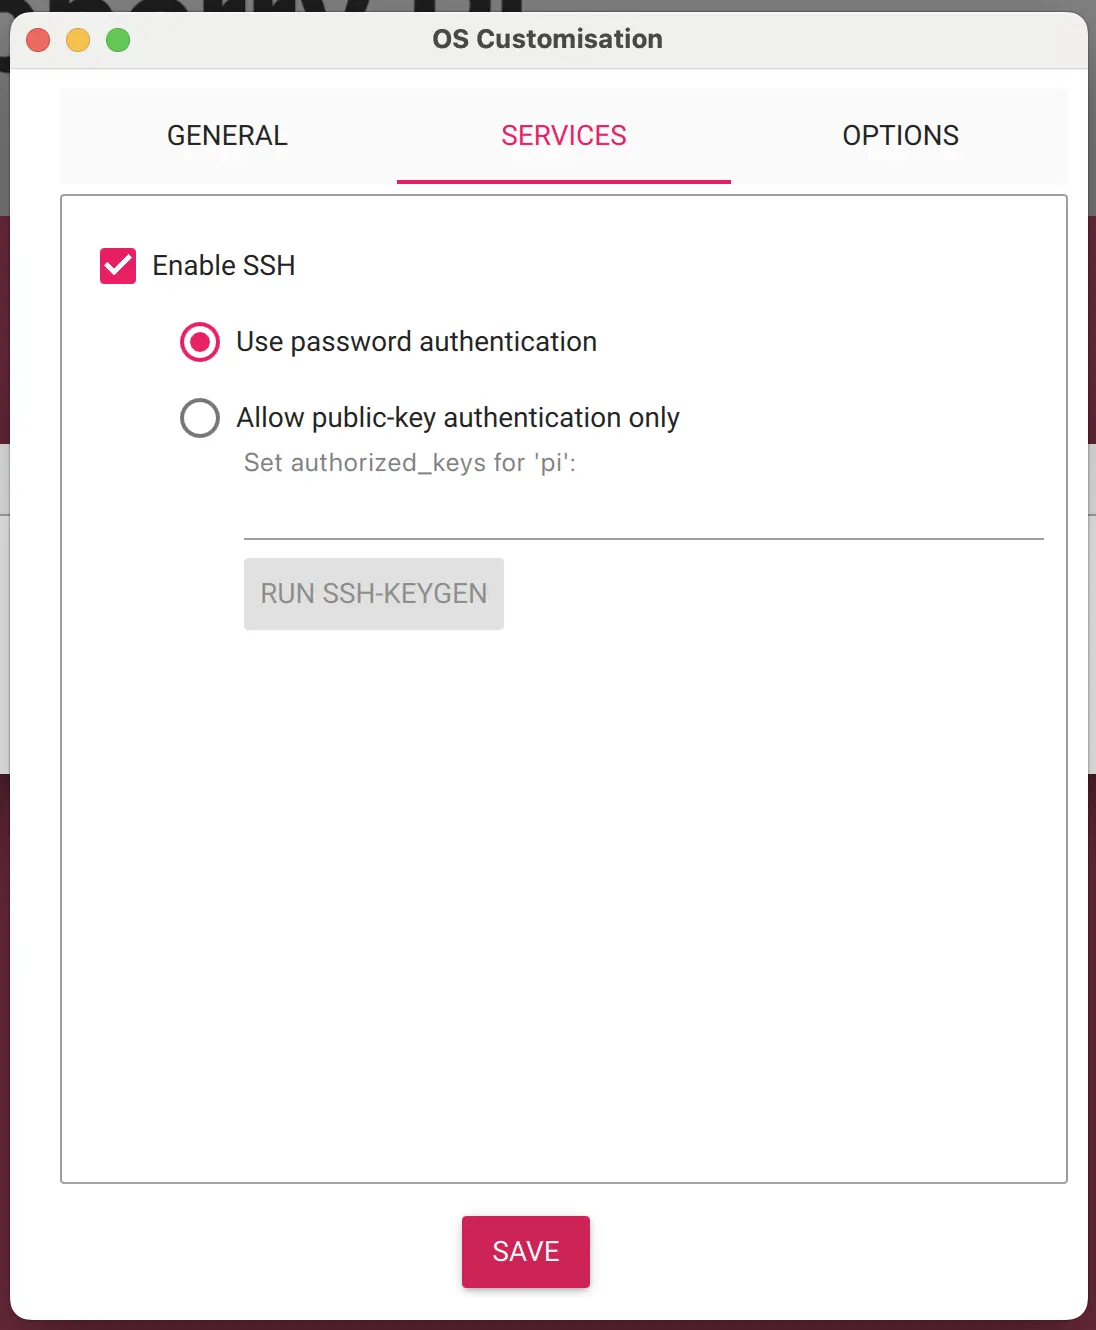
Get it from here.Heads up: the Imager screenshots below are from v1.8.5, which is what I used when I built this. Imager 2.0 landed in November 2025 and threw the old layout out entirely. Everything is now a full-window, step-by-step wizard: select your device → choose your OS → pick your storage → configure your system → write → done. Same settings, same order, much less hunting. So follow the words rather than the pictures here.
-
Choose OS
Go for the Raspberry Pi OS Lite (64-bit) (you do NOT need the desktop version). Less bloat, more stability. Since October 2025 the images are based on Debian 13 “Trixie” with the 6.12 LTS kernel, and that’s what you’ll get by default.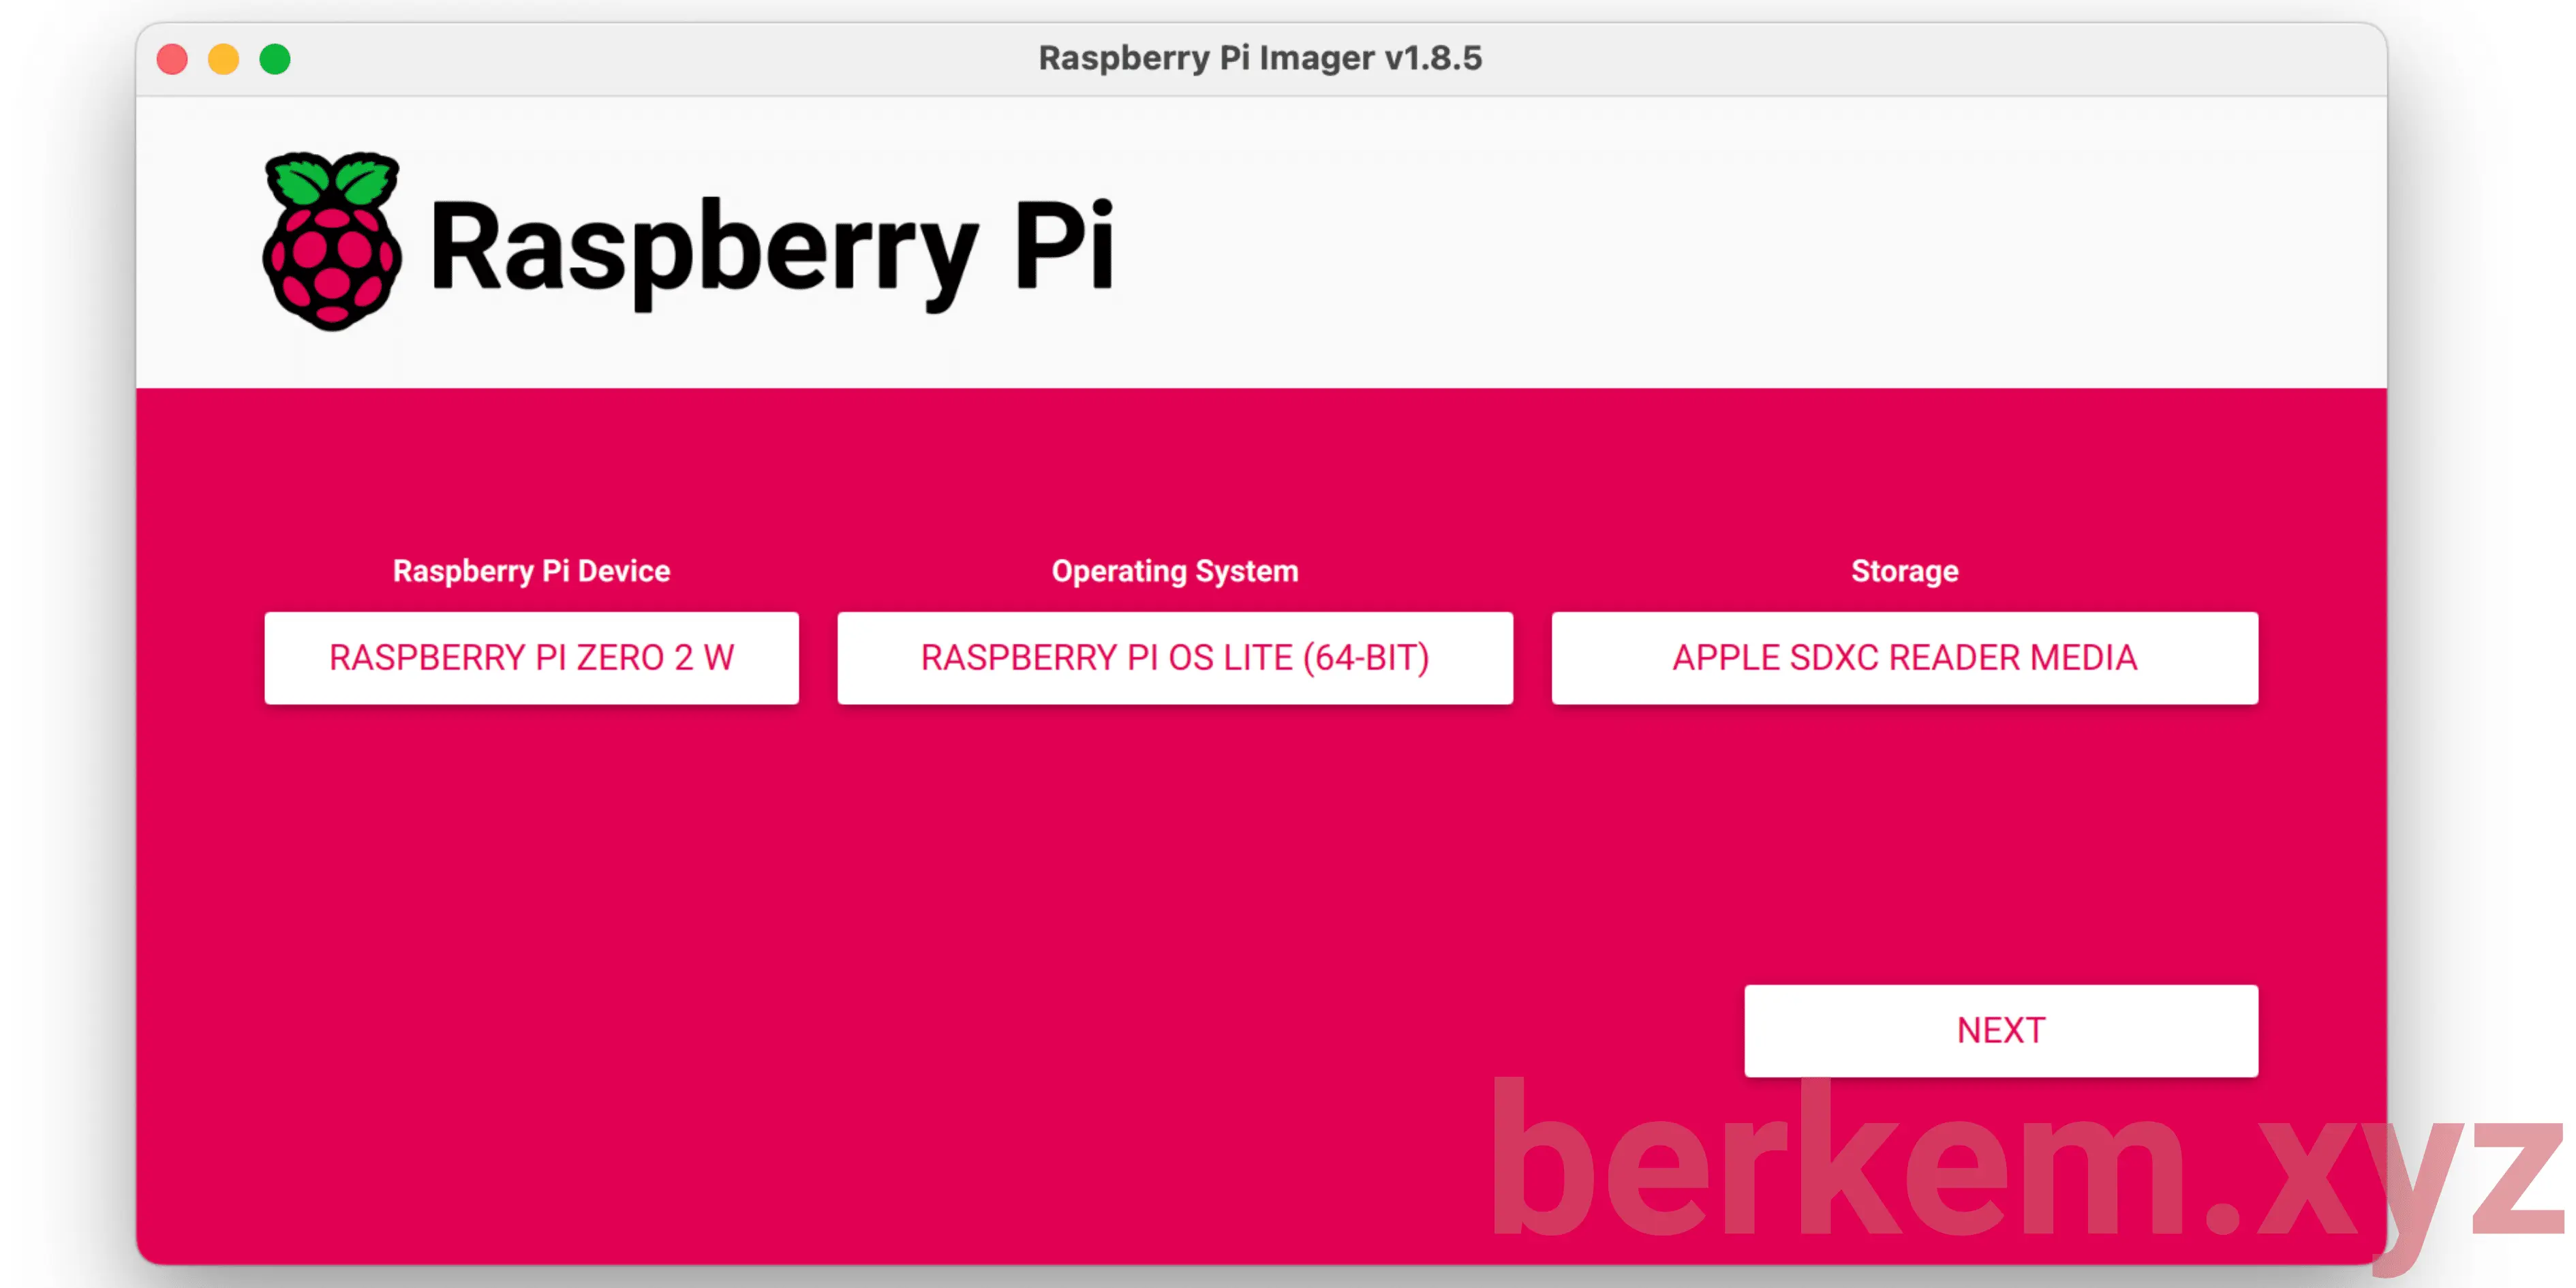
-
Set Device Name
Name it something memorable likepihole. Helps with SSH later. In Imager 2.0 this lives in the Configure your system step, under hostname.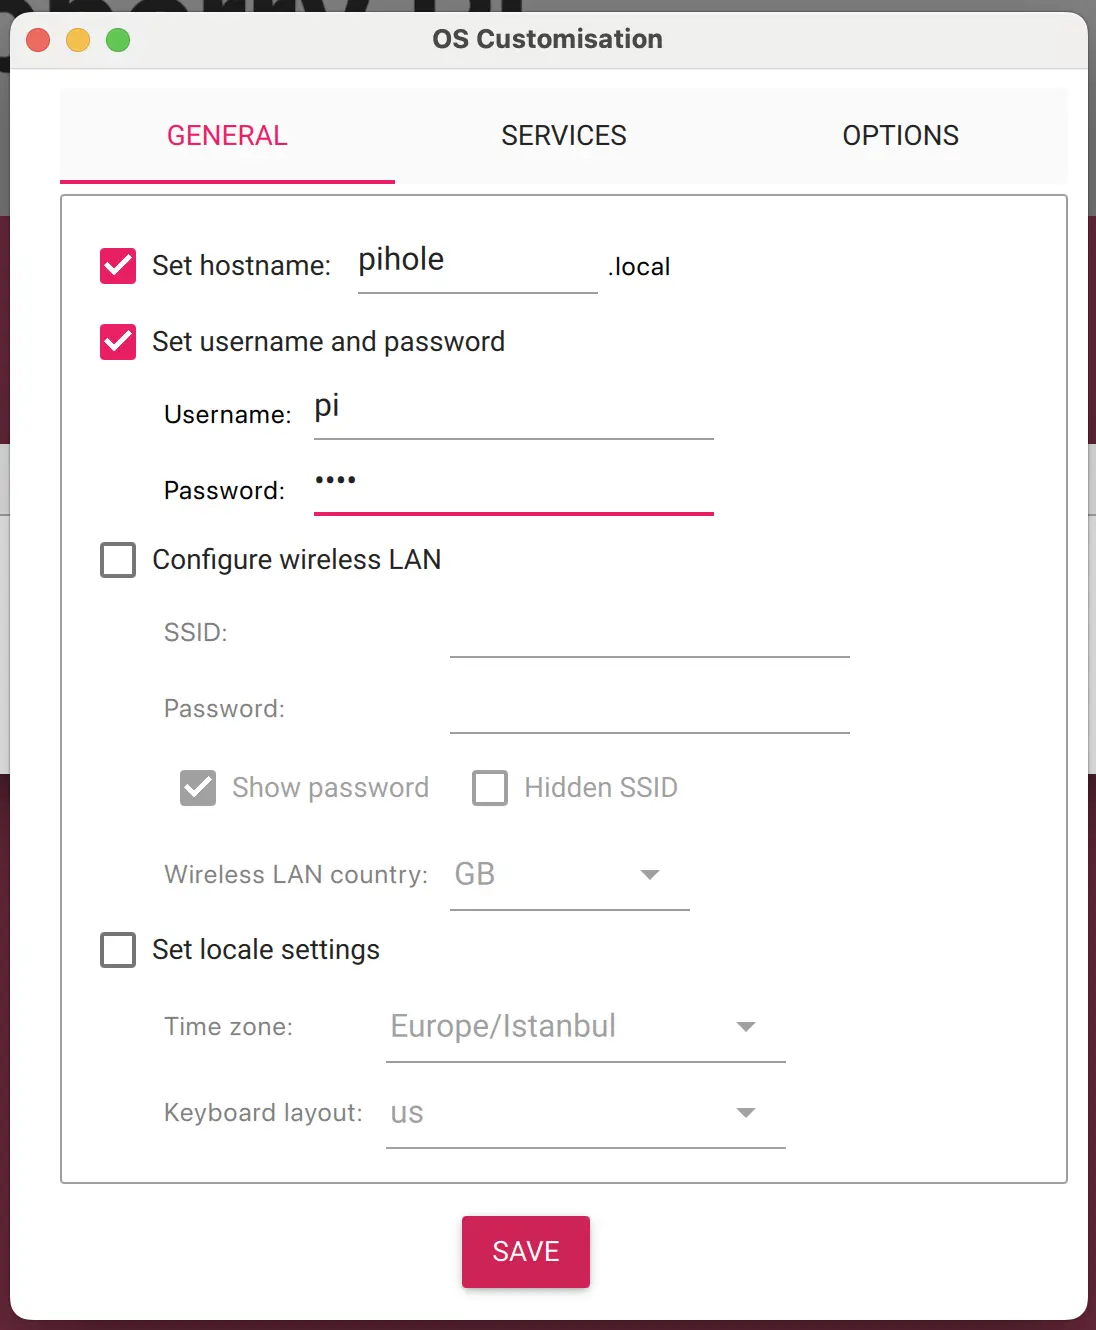
-
Network Setup
- Ethernet: If using Pi Zero 2W + ethernet hat, disable WiFi during imaging (they sometimes fight).
- SSH: Enable it. And choose passwords authentication.
-
Write to SD Card
Fire it up and wait until it’s done.
Step 3: Getting the Pi on Your Network
-
Plug in the SD card and power up your Pi.
-
Wait 2-3 minutes to boot up.
-
SSH in:
ssh pi@pihole.local
# or using IP if you've configured it
ssh pi@<IP_ADDRESS>
pi here before “@” is your user name, and pihole after “@” is the device name you have decided.
If this doesn’t work, use a monitor/keyboard once, or hunt down its IP on your router admin page.
-
Update Everything
sudo apt update && sudo apt upgrade -y
sudo reboot
After rebooting, SSH back in.
-
Find Your Pi’s IP Address
hostname -INote this down. You’ll need it a lot.
-
Assign a Static IP (Important!)
Go to your router’s admin panel (usually192.168.1.1or similar).- Find the “DHCP Reservation” or “Static Lease” section.
- Assign your Pi’s IP (from previous step) so it doesn’t change and break your ad-blocking.
Tip: Every router looks different, but it’s generally in the LAN or DHCP settings.
Step 4: Installing Pi-hole
Now, the fun part. SSH into your Pi and run:
curl -sSL https://install.pi-hole.net | bash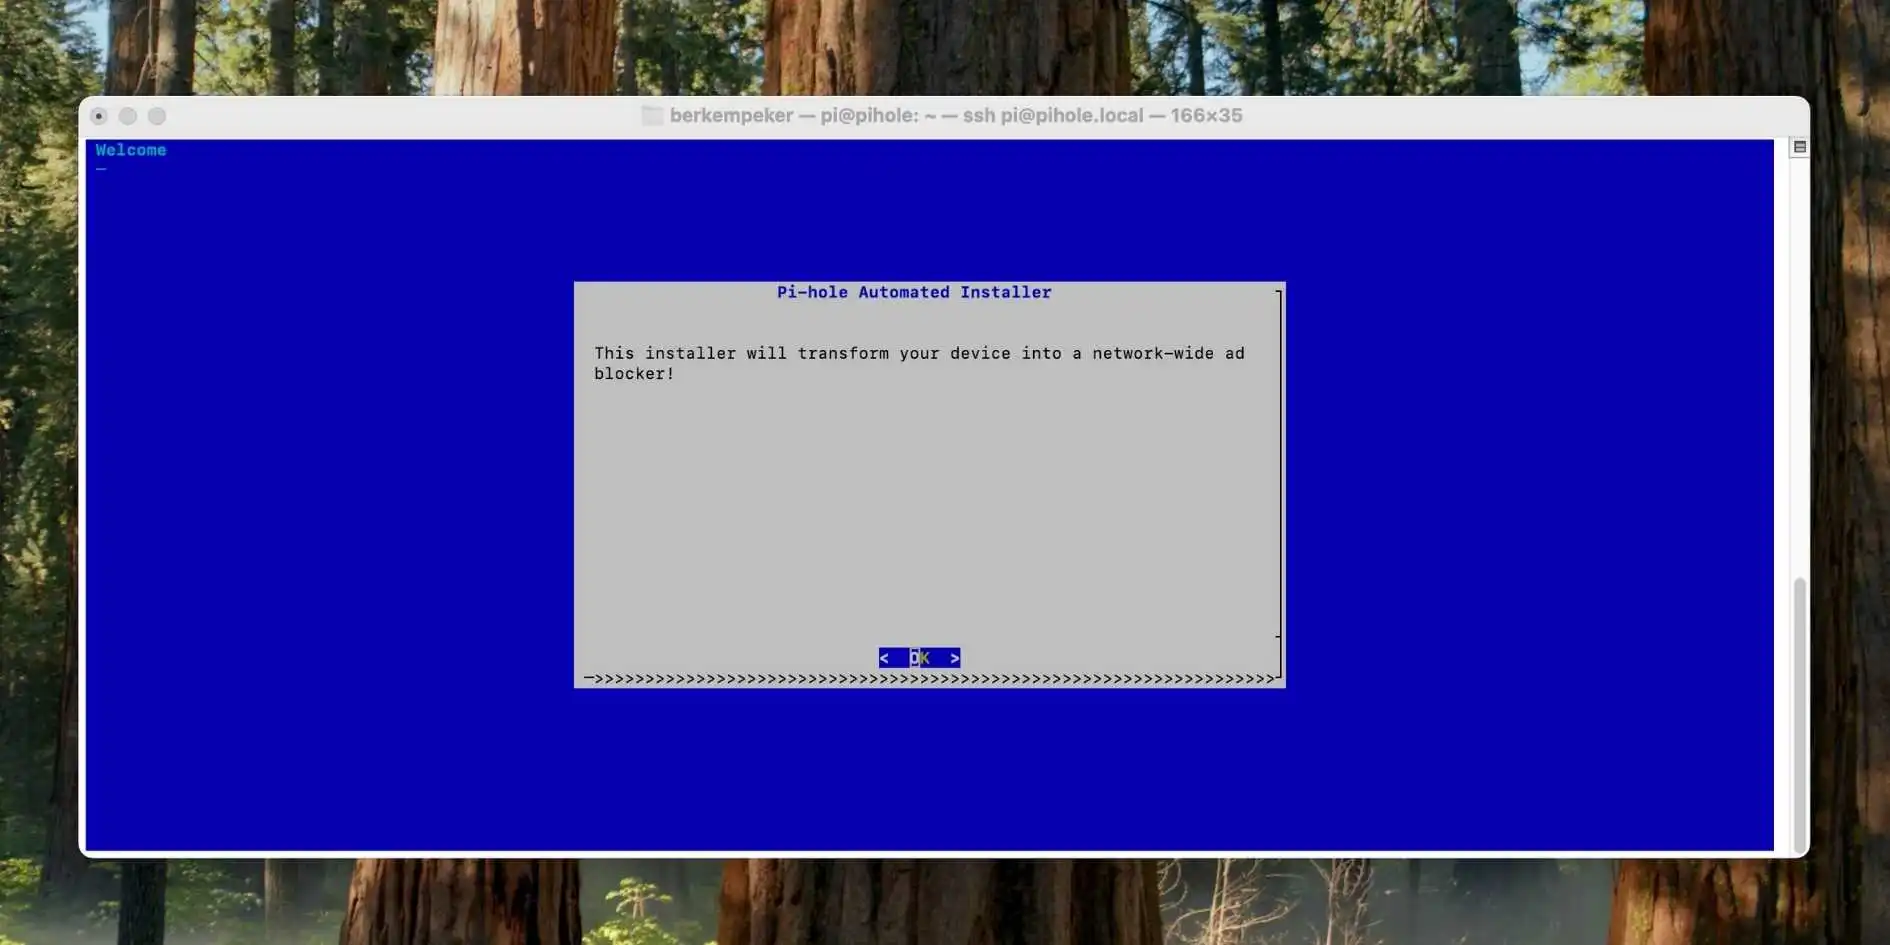
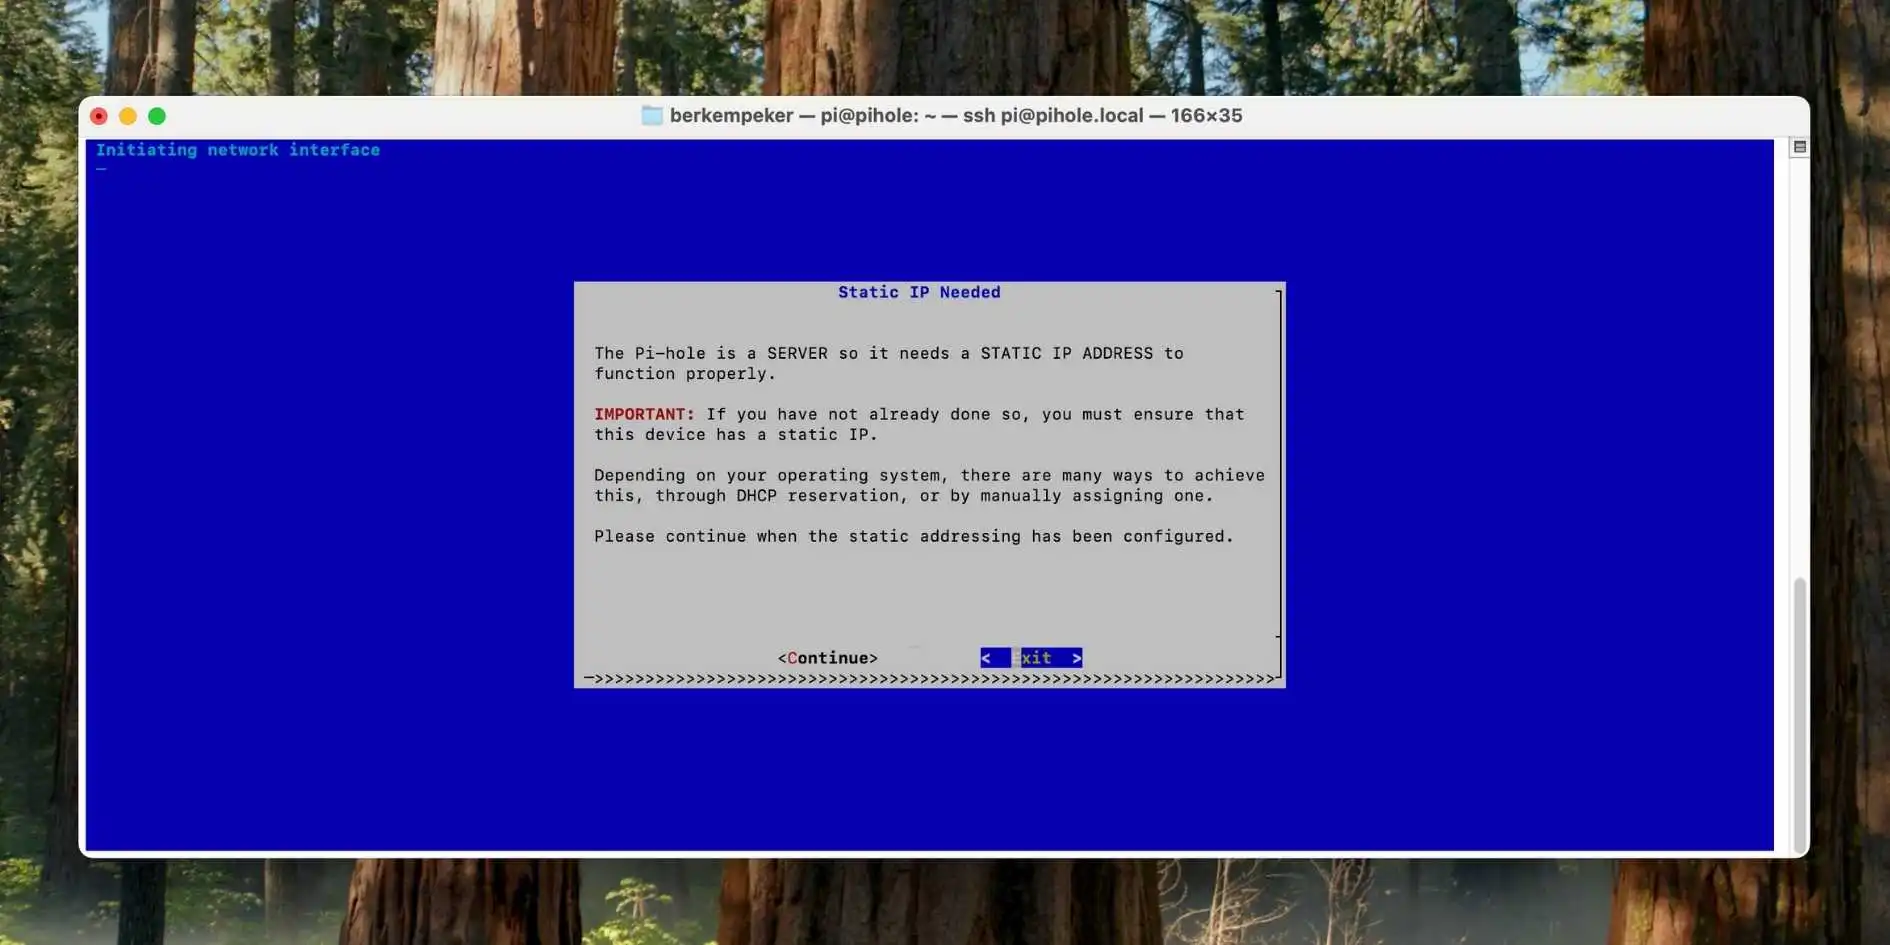
You’ll get the legendary blue terminal menu. Good news: the one-liner survived the jump to Pi-hole v6, so this part hasn’t changed. What did change is everything after the install, and I’ll flag those as we go.
Here’s what to watch for:
- Static IP Address: Double check you have reserved the IP address for the Raspberry Pi.
-
Upstream DNS Provider:
Choices like Cloudflare, Google, OpenDNS. Pick your favorite. It’s what Pi-hole will use to resolve non-blocked sites. -
Query logging:
The installer asks “Would you like to enable query logging?”. Say yes. Without it the dashboard is a very pretty box of zeroes, and you lose the one tool that tells you why something broke. -
Privacy mode for FTL:
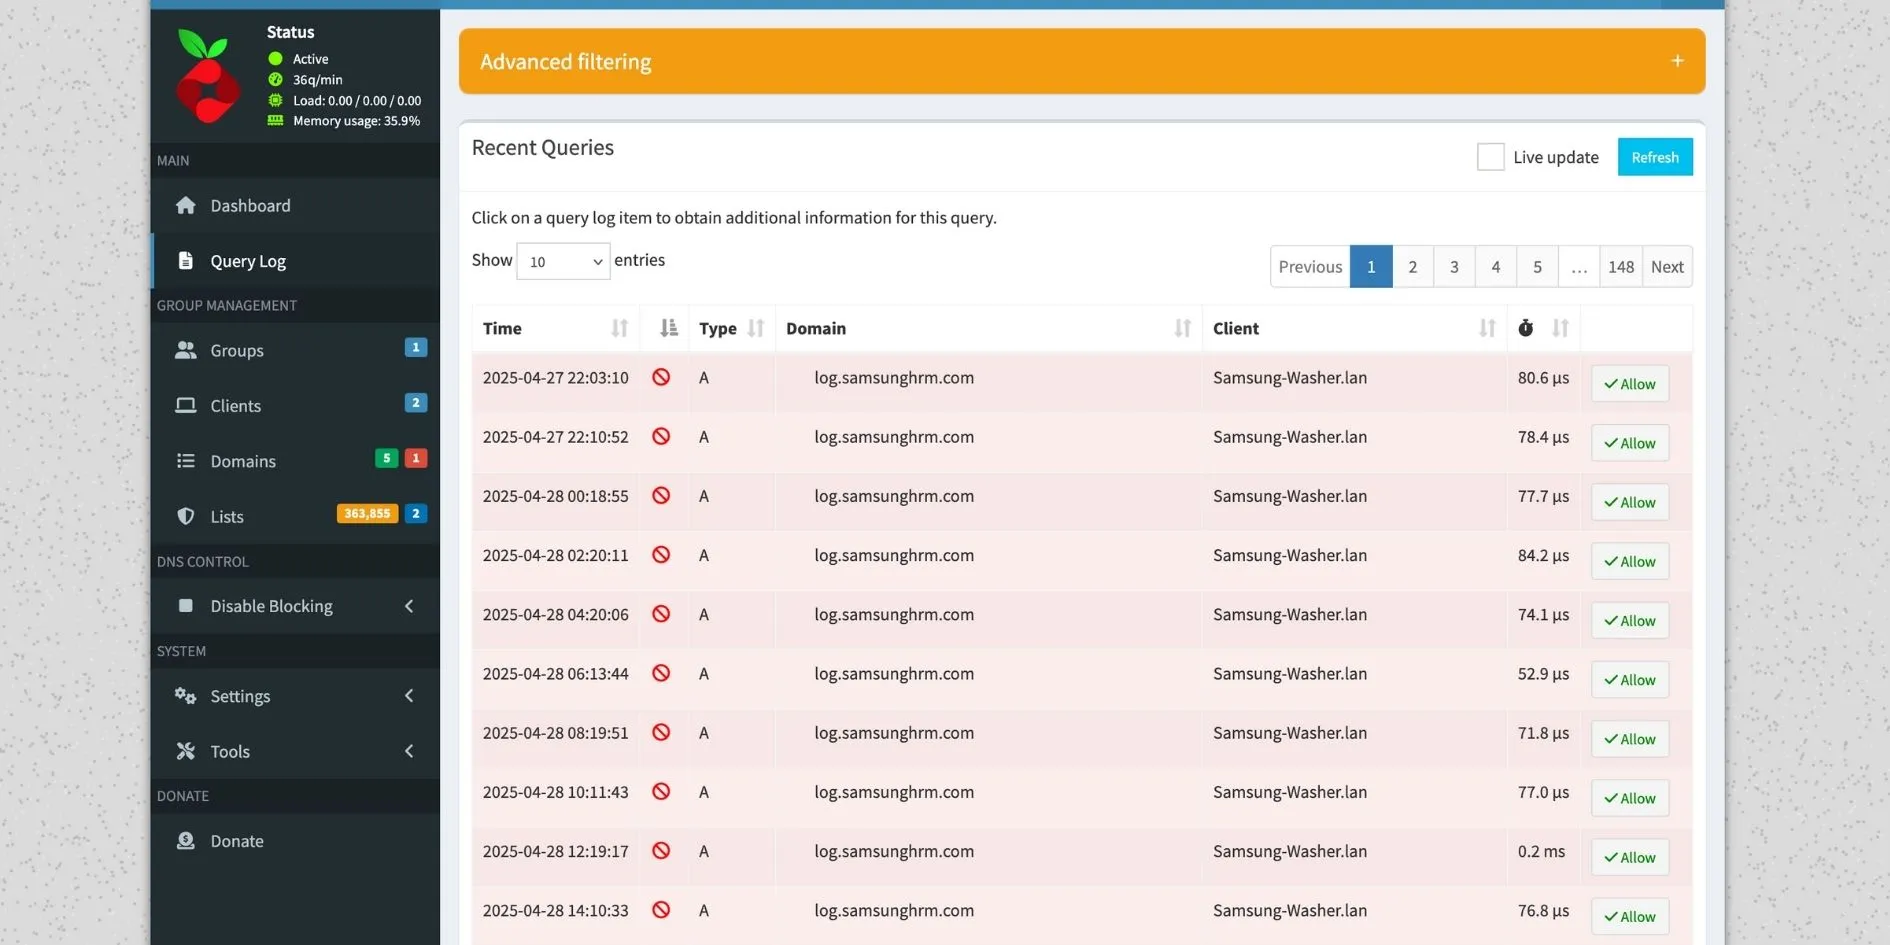
A four-way choice: Show everything, Hide domains, Hide domains and clients, Anonymous mode. I go with Show everything, because on a home network the only person being spied on is me, and I’d like to know what my washing machine is up to. -
Blocklists:
It offers StevenBlack’s Unified Hosts List. Take it. We’ll supercharge these later.
-
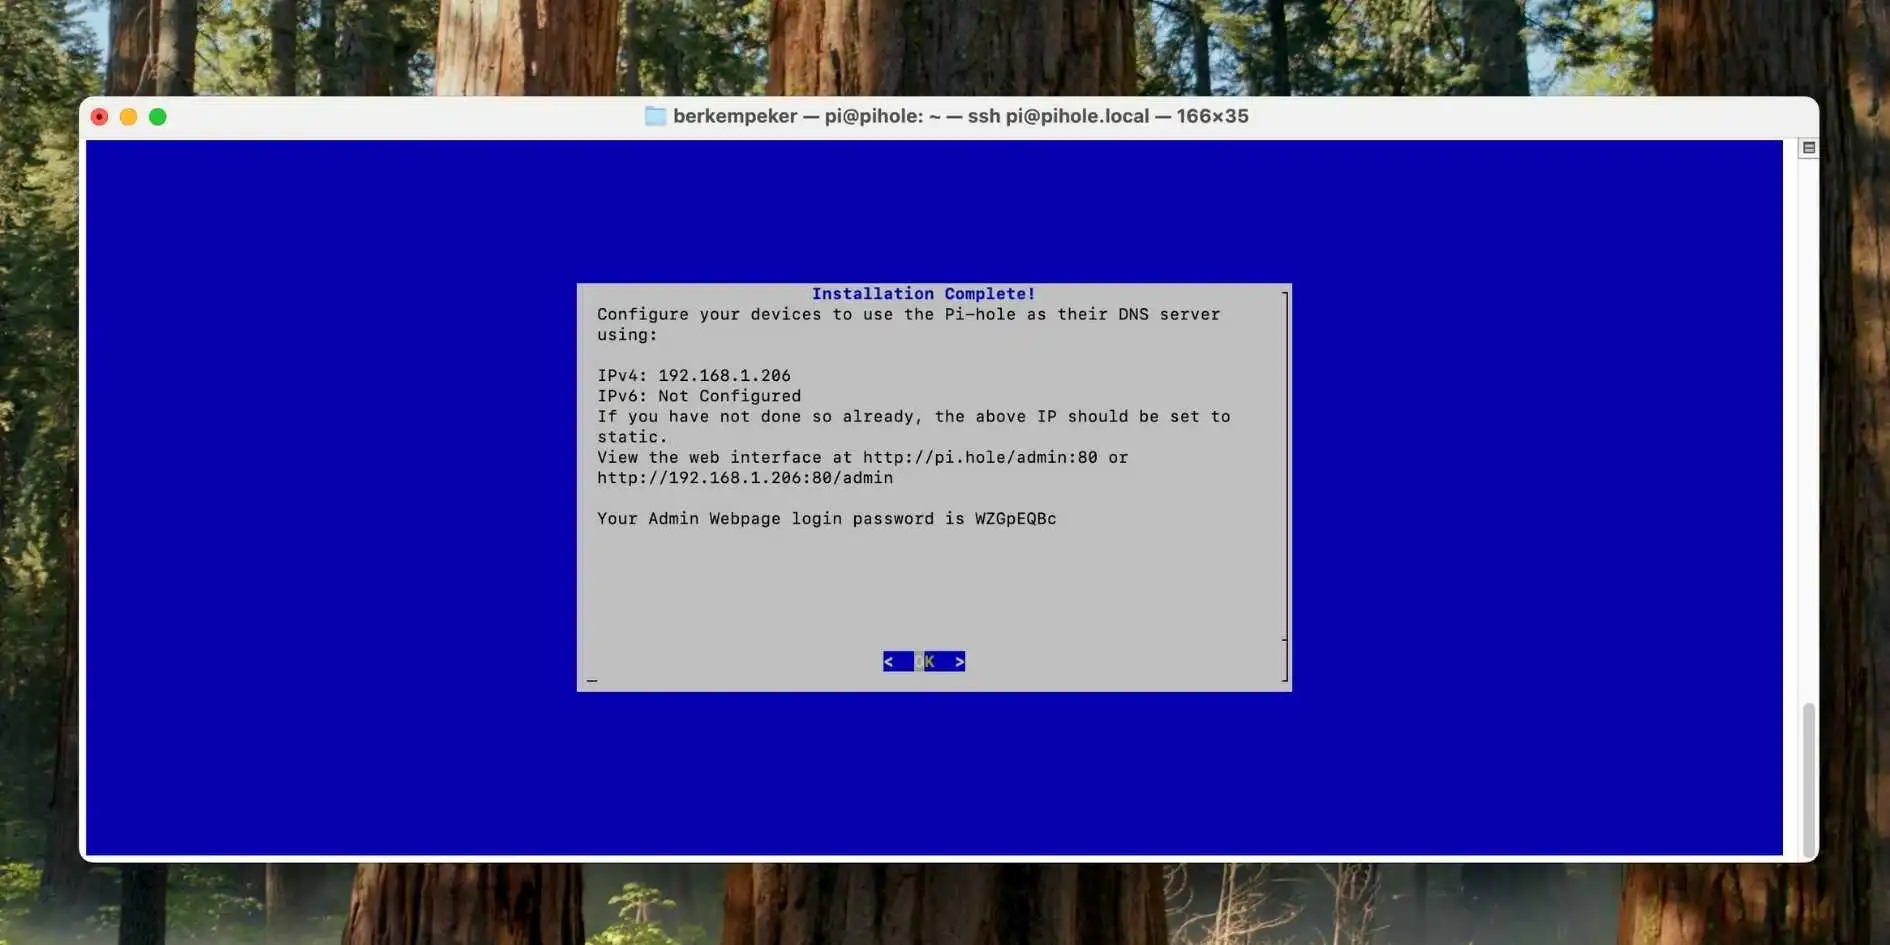
Finish Installation.
The final screen hands you a randomly generated web admin password. Write it down or copy/paste to a safe spot. It is shown exactly once. -
Using Pi-hole as DHCP Server:
- You should go on and change your router’s DHCP address with the IP address of Raspbery Pi. (This is what I do!)
- You can also control this manually and set DNS per device.
First Time Logging in
- Go to
http://<Pi-IP-address>/admin(orhttp://pi.hole/adminonce Pi-hole is answering your DNS) - Log in using the password you saved earlier.
If you forget the password, no worries! SSH into the Pi and run:
pihole setpasswordv6 change: this used to be
pihole -a -p. In v6 the command ispihole setpassword, and you can pass the new password inline (pihole setpassword hunter2) or leave it off to be prompted without it showing on screen.
One more v6 quirk worth doing right now, while you’re still in the terminal. Pi-hole v6 routes every CLI command through its own authenticated API, so pihole commands will keep nagging you for the web password. Add yourself to the pihole group once and the nagging stops:
sudo usermod -aG pihole $USERLog out and back in for it to take effect.
Step 5: DHCP and Network Configuration
If Pi-hole is handling DHCP:
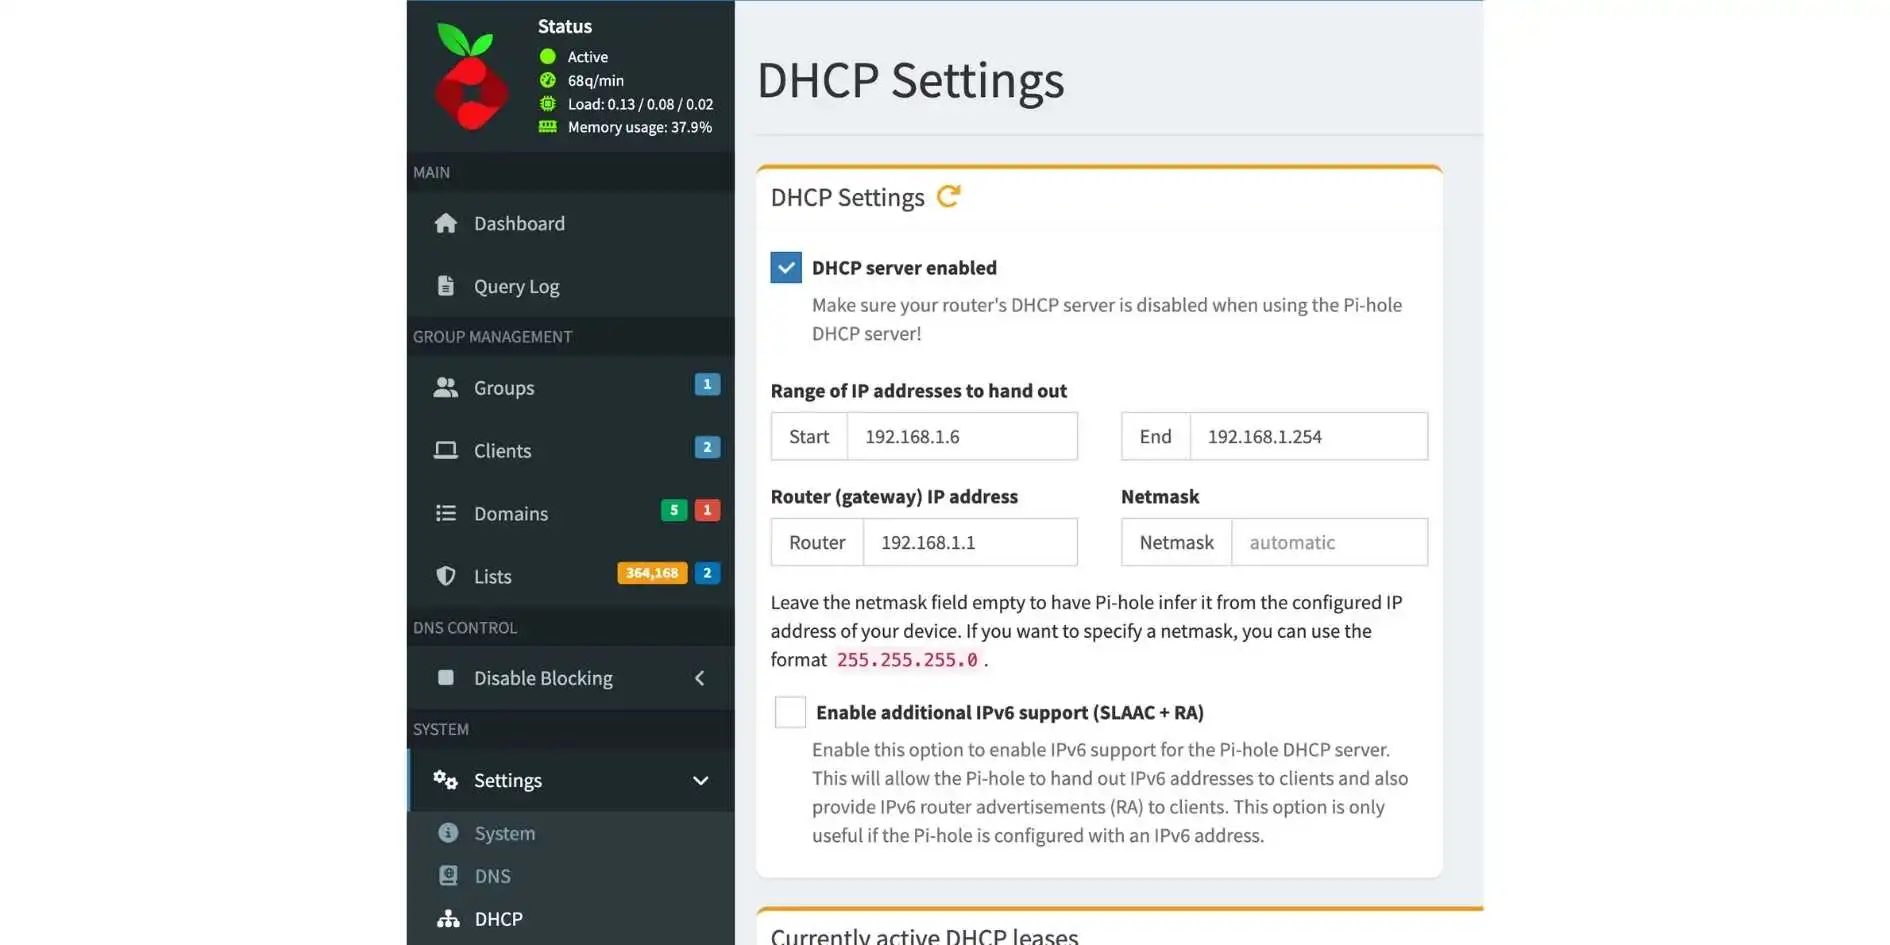
- Enable DHCP in Pi-hole
Go toSettings > DHCP. Enable it, set your IP range. - Disable DHCP on Your Router
Every router brand is different, but look under LAN or DHCP settings.
If using your router’s DHCP:
-
Simply set your Pi-hole as the DNS for each device.
- Windows: Network & Internet Settings → Change Adapter Options
- macOS: Network Details → DNS
- Android/iOS: WiFi → Advanced
Result: Devices now send DNS queries through Pi-hole!
One thing I’d gently talk you out of: setting a secondary DNS server on your router as a “backup”. That is not failover. Devices happily use whichever resolver answers first, so half your traffic will quietly skip Pi-hole and you’ll spend an evening wondering why ads are back. Pi-hole, or nothing.
Step 6: Supercharge Your Blocklists
The default blocklists are decent, but why stop there? For more comprehensive blocking, check DNS Blocklists.
- Click “Lists” in Pi-hole’s admin sidebar, under Group Management. (In v5 this page was called Adlists. Same thing, new name, and v6 also lets you subscribe to allowlists here.)
- Add new URL(s) from that repo.
- Refresh Gravity:
After adding lists, go toTools > Update Gravityor run:pihole -g
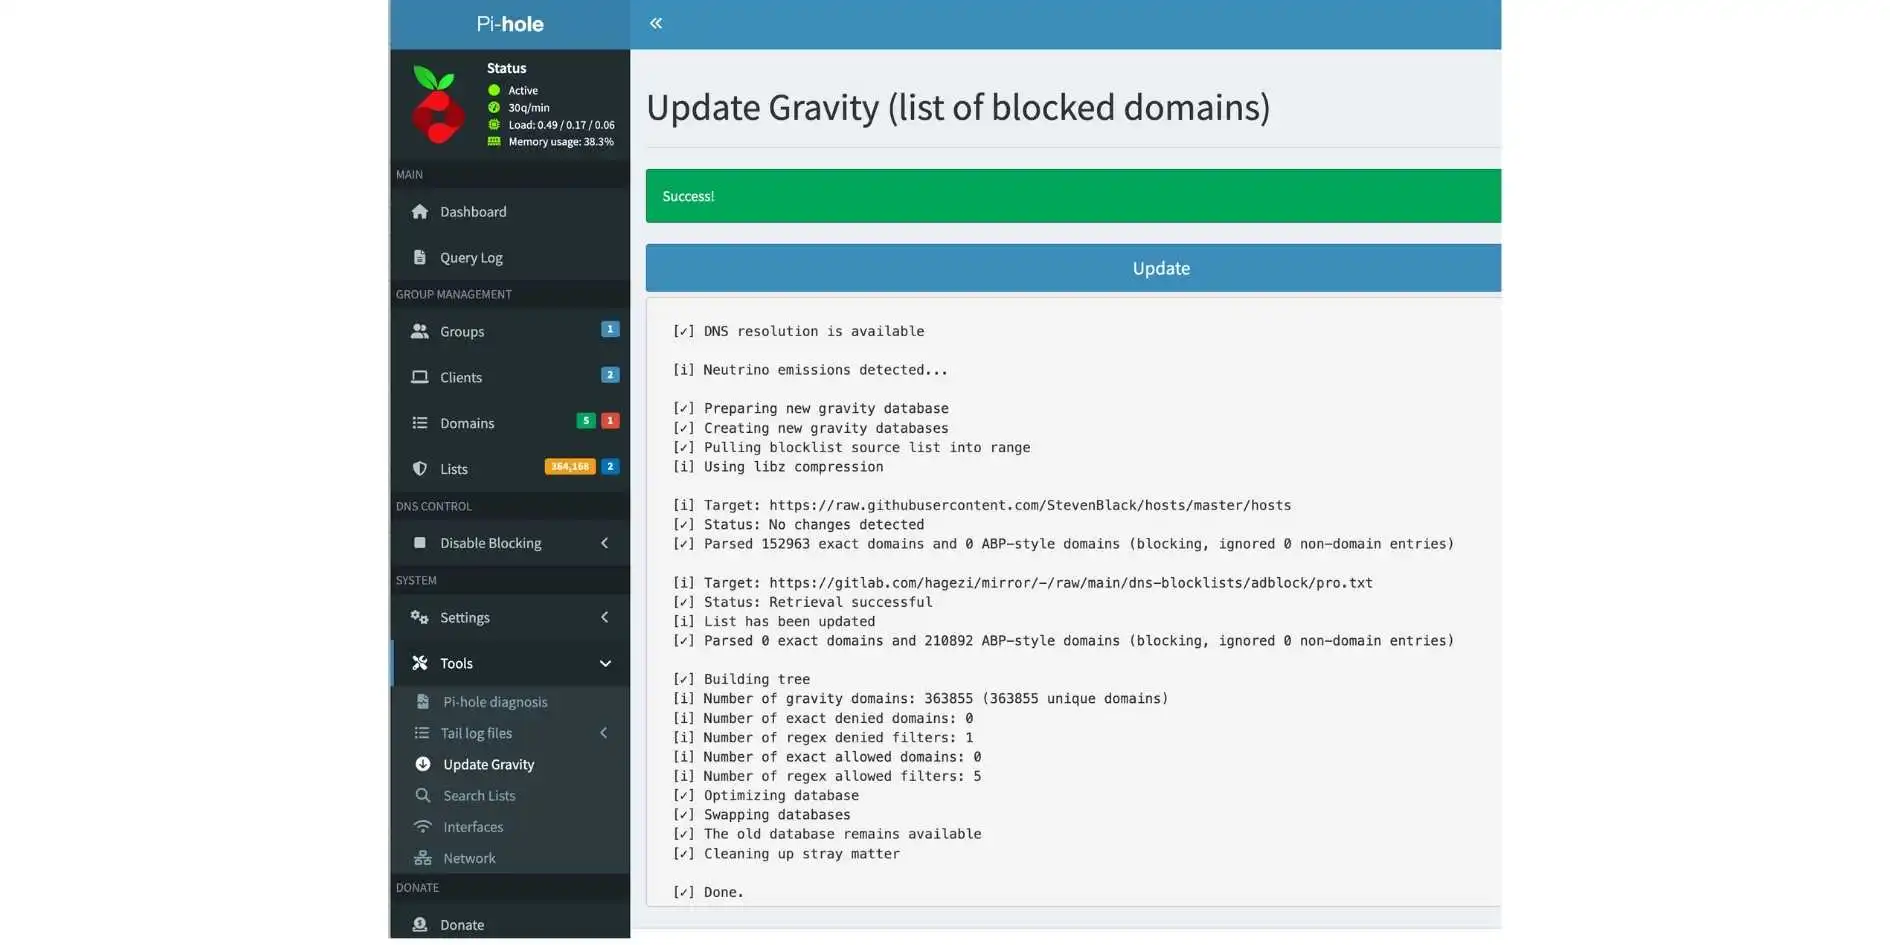
Restraint is a feature here. Two or three well-maintained lists cover almost everything, and every list you stack on top is more RAM and a longer gravity run on a 512 MB board. Mine sits at around 364,000 domains and that is already generous.
Step 7: Testing and Monitoring
Visit an Ad-Heavy Site, open a browser and head to a news or blog site notorious for ads. See fewer or no ads? Success!
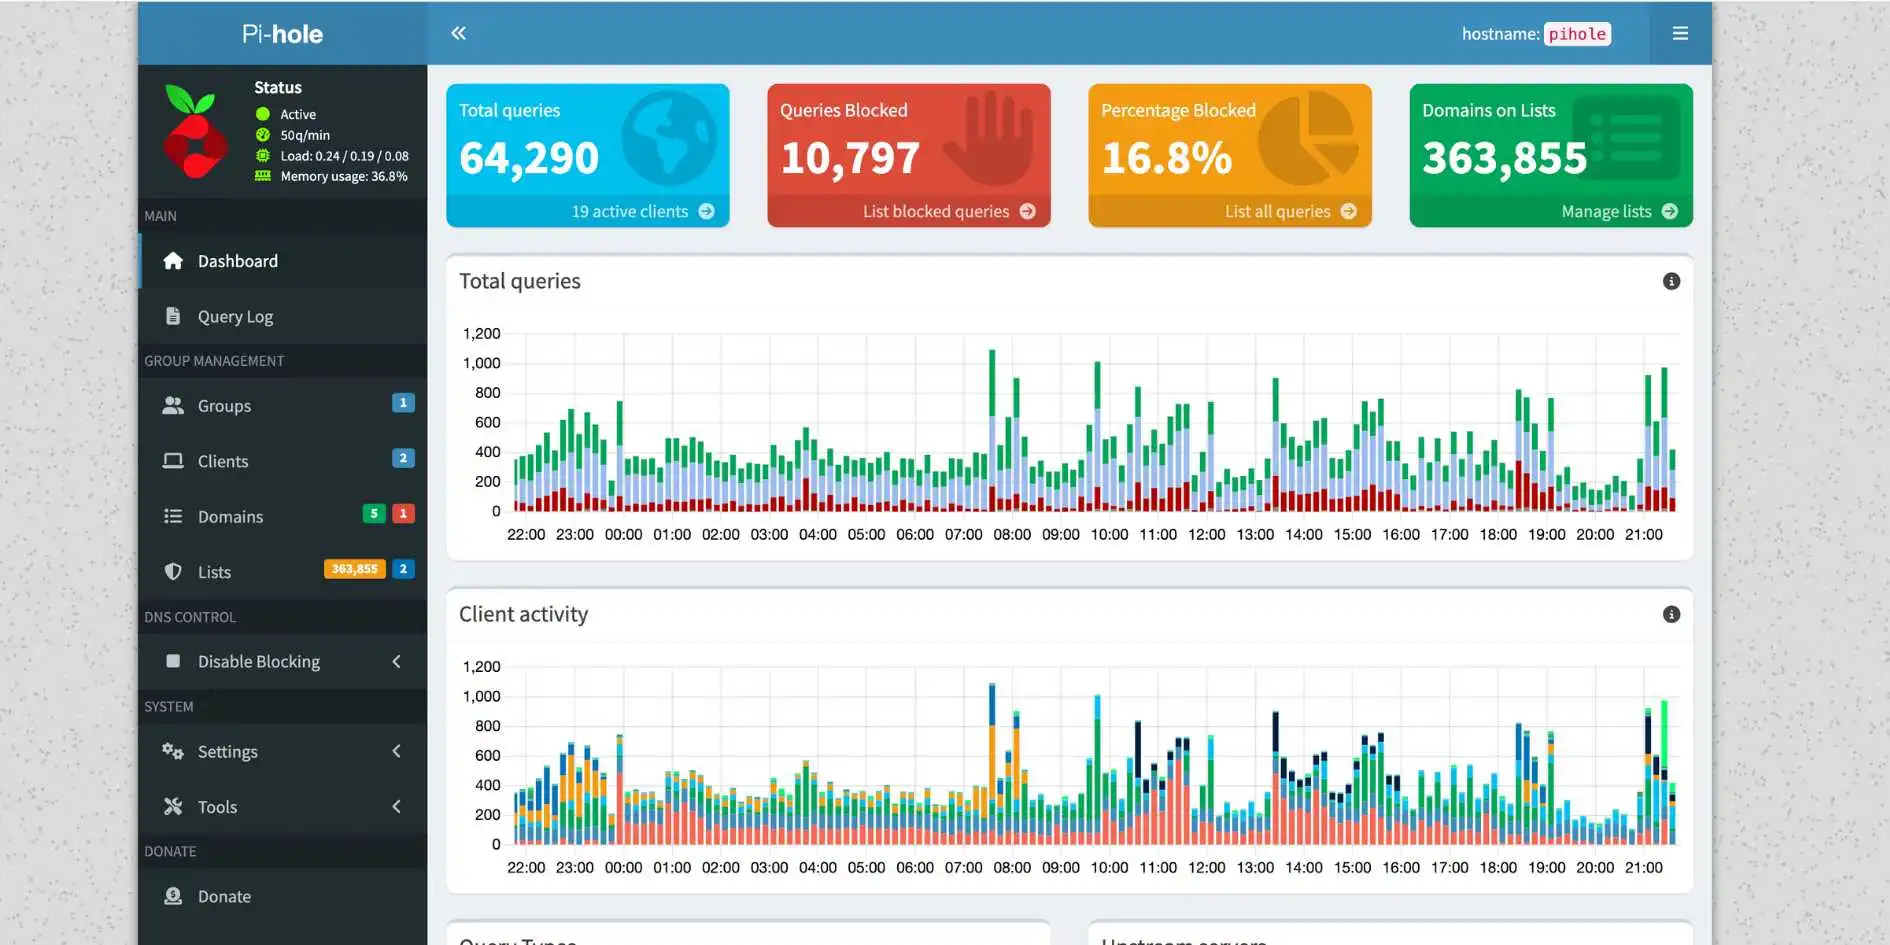
Check the Pi-hole Dashboard, watch as queries, blocks, and client stats roll in! See which devices are the chattiest, and which domains get blocked most. After I started using Pi-hole, I’ve learned that my dear washing machine is like a whale in a ocean, singing non-stop to make itself heard!
Can a Pi Zero 2W handle a whole household?
This is the question I get most, and the honest answer is: yes, easily, and it’s not close.
Look at the dashboard screenshot above. That’s mine: 19 active clients, 64,290 queries in a day, around 364,000 domains loaded, load average 0.24, memory at 36.8%. On a board with 512 MB of RAM and a 1 GHz quad-core Cortex-A53. DNS queries are tiny and the answers are mostly cached, so a Pi-hole spends its life doing almost nothing very quickly. You would need a properly strange household to make this board sweat.
The specs, so you know exactly what you’re working with:
- 512 MB LPDDR2 RAM. Pi-hole’s official minimum is 512 MB, so you are sitting exactly on the floor. It works, and it has worked for me for over a year, but it does mean the Zero 2W is a Pi-hole box and not a Pi-hole-plus-four-other-containers box.
- Quad-core Cortex-A53 at 1 GHz. Never the bottleneck for DNS.
- No ethernet port. WiFi is 2.4 GHz 802.11 b/g/n only. This, not the CPU, is the actual weak spot.
- Ethernet hats hang off USB 2.0. Fine for DNS, which is a rounding error of bandwidth, but don’t expect to also use it as a file server.
So the real limits aren’t about capacity, they’re about consequences:
- It becomes a single point of failure. If Pi-hole is also your DHCP server and it dies, nobody in the house has internet, and the complaints arrive within ninety seconds. Ask me how I know.
- WiFi is the thing that will bite you. Every DNS query in the house now depends on one 2.4 GHz link. Use the ethernet hat. I keep saying this because I keep being right about it.
- Don’t pile things on top. At 512 MB, adding Portainer or an LLM or a photo library is how you find out what OOM-killer means. Keep it single-purpose.
Keeping Pi-hole updated and healthy
Pi-hole is on a rolling release now, and updates are frequent. As of July 2026 the current stack is Core v6.4.3, FTL v6.7 and Web v6.6, and that July release alone closed six security advisories. This is not software to leave untouched for a year.
Two commands, once a month, in this order:
# 1. The OS underneath
sudo apt update && sudo apt upgrade -y

# 2. Pi-hole itself (Core, Web and FTL)
pihole -up
pihole -up checks all three components and reinstalls only what’s out of date. Check where you landed with pihole version.
The rest of the routine:
- Whitelisting: Occasionally, a site or service you want to use gets blocked. Use the dashboard to allow individual domains, or
pihole allow annoying.example.comfrom the terminal. - Gravity refreshes itself weekly, so you don’t need to babysit
pihole -g. Run it manually only after you change lists. - Try New Blocklists: Experiment with more privacy filter lists. Just don’t get too aggressive, or you might break things you need.
- Backups: SD cards do fail.
Settings > Teleporterexports your whole configuration as a single file, which is a far nicer thing to restore from than a two-year-old card image. Do both.
Enjoy Ad-free Browsing! Sit back and enjoy the peace and quiet of an ad-minimized internet.
Troubleshooting the usual suspects
Everything above assumes a good day. Here’s what actually goes wrong, roughly in the order it went wrong for me.
pihole.local doesn’t resolve, so I can’t SSH in.
mDNS is moody, especially on Windows. Skip it: find the Pi’s IP in your router’s client list and SSH to the IP directly. Once it has a static lease you can stop caring.
The web interface won’t load on port 80.
v6 dropped lighttpd and embedded its own web server inside pihole-FTL. If something else on the Pi already owns port 80, it quietly falls back, usually to 8080, and never tells you. Ask it directly:
sudo pihole-FTL --config webserver.portThen browse to http://<Pi-IP>:<that-port>/admin.
Every pihole command asks for a password.
That’s the v6 API auth I mentioned in Step 4. sudo usermod -aG pihole $USER, then log out and back in.
Ads are still showing on some devices.
Nine times out of ten the device simply isn’t using Pi-hole. Open the Query Log and look for that client. If it isn’t there at all, the usual culprits are:
- Encrypted DNS in the browser. Chrome, Firefox and Edge ship DNS-over-HTTPS on by default in some regions and it bypasses your resolver entirely. Turn off “Secure DNS” / “DNS over HTTPS” in browser settings.
- Hardcoded DNS in the device. Plenty of smart TVs, streaming sticks and consoles are wired to
8.8.8.8and ignore whatever DHCP tells them. - IPv6. Your router may still be handing out its own IPv6 DNS server alongside Pi-hole’s IPv4. Devices will use it. Either disable IPv6 DNS advertisement on the router or give Pi-hole an IPv6 address too.
Ads are still showing on YouTube or Twitch.
Those aren’t going away, and no blocklist will fix it. Pi-hole works at the domain level, and those platforms serve ads from the same domains as the content. Blocking that domain blocks the video. This is a real limitation, not a misconfiguration.
Gravity updates got slow, or fell over.
You’ve stacked too many lists onto 512 MB. Trim back to two or three good ones and rerun pihole -g.
Nothing above helped.
pihole debugIt runs a full diagnostic, points at what’s broken, and can upload the log so the forum can look at it. It’s a genuinely good debugger and I’ve never once regretted running it.
Frequently asked questions
What is Pi-hole and why use it?
Pi-hole is a network-wide ad and tracker blocker that works as a DNS sinkhole. Because it filters at the DNS level, it protects every device on your network at once, including the ones you can’t install a browser extension on, like TVs, consoles and appliances.
Can I install Pi-hole on any Raspberry Pi, or just the Zero 2W?
Any of them. The install command and every step in this guide are identical on a Pi 3, Pi 4, Pi 5 or Zero W. Pi-hole’s stated requirements are just 512 MB of RAM and 2 GB of free space, so the choice is about size, noise and power draw rather than capability.
Is a Raspberry Pi Zero 2W powerful enough to run Pi-hole?
Comfortably. Mine handles 19 clients and around 64,000 queries a day at 37% memory use and a load average under 0.3. The 512 MB of RAM is the real constraint, and it only matters if you try to run other services alongside it.
Do I need the ethernet hat, or is WiFi fine?
WiFi works, but I’d use the hat. The Zero 2W only has 2.4 GHz 802.11 b/g/n, and once Pi-hole is your DNS server, every device in the house depends on that single wireless link staying up.
What changed in Pi-hole v6?
The installer one-liner is the same, but lighttpd is gone in favour of a web server built into pihole-FTL, pihole -a -p became pihole setpassword, the Adlists page is now Lists, and CLI commands authenticate through the API, so you’ll want to add your user to the pihole group.
How do I stop my Raspberry Pi’s IP address from changing?
Set a DHCP reservation (sometimes called a static lease) for the Pi in your router’s admin panel. If the address moves, every device on your network loses DNS at once.
Which upstream DNS provider should I choose?
Cloudflare, Google and OpenDNS are all offered during install and any of them is fine. It doesn’t affect blocking at all, only who sees the queries Pi-hole forwards, so pick on privacy policy or on whichever is fastest from your connection.
Can Pi-hole be my DHCP server?
Yes, and it’s what I do. Enable it under Settings > DHCP and disable DHCP on the router first. The upside is that every device gets Pi-hole automatically; the downside is that the Pi becomes a single point of failure for your whole network.
Do I need to keep Pi-hole updated?
Yes. Run sudo apt update && sudo apt upgrade -y followed by pihole -up about once a month. Pi-hole ships frequently and recent releases have included security fixes.
Conclusion
Running Pi-hole on a Raspberry Pi Zero 2W (with Ethernet) is cheap, compact, and deadly effective against ads and creepy telemetry. Once set up, it quietly protects anything on your network, no browser extensions required.
Just remember: network-level ad-blocking is only as good as its blocklists, so keep checking Pi-hole repositories for updates and new tricks. Your future self and your network will thank you.
If this gave you the homelab itch, the Zero 2W is a gateway drug. I’ve collected the rest of what I run on Pi boards in 10 Raspberry Pi homelab projects, and there’s a self-hosted n8n setup in there too if you like automating things.
Check some important links for Pi-hole
| Pi-hole official website |
|---|
| r/pihole |
| Repo for Pi-hole |
What changed in this update
Everything above was rechecked in July 2026 against the current Pi-hole installer and docs. What moved:
- Corrected the v6 commands.
pihole -a -pis nowpihole setpassword, and the Adlists page is now called Lists. - Added the v6 CLI auth step (
sudo usermod -aG pihole $USER), which trips up everyone who upgrades and nobody who reads about it first. - Rewrote the installer walkthrough to match the prompts the script actually asks today, including query logging, the four FTL privacy levels and the StevenBlack list.
- Flagged Raspberry Pi Imager 2.0, which replaced the old modal with a full wizard in November 2025, and noted that Raspberry Pi OS is now Debian 13 “Trixie”.
- Added a section on what the Zero 2W can really take, with actual numbers off my own box.
- Added a troubleshooting section, an update routine and an FAQ.
Let me know if this works for you!
Cheers,
Berkem


