10 Raspberry Pi HomeLab Projects You Will Actually Use in 2026
Updated: 26 Jul 2026. Jump to updates.
In the early 2010s people bought Raspberry Pi cards to teach kids Python or to build retro game consoles. Fast-forward to this day and this nice mini computer can host the same services that once required a rack of chunky servers. Rising cloud costs, growing privacy concerns and the thrill of true ownership have sparked a homelab revolution, and the Raspberry Pi 5 still sits at the center of many homegrown data centers.
People use Raspberry Pi boards for Plex, Retro Gaming, Magic Mirrors, and many other things that I’m too lazy to work on. I like them because they are tiny, easy to find something interesting, and upgradable. Yes, you can use cheaper (and maybe more capable) N100 Mini PCs. Why not both? I’m just tinkering with my shiny toys hehe.
I used to say Pi boards were cheap. In 2026 I have to be honest with you: that part broke. More on that in a minute, because it genuinely changes the buying advice.
You can also use an old laptop, and a lot of people do. Why a Pi instead? Three reasons still stand out:
- Ecosystem depth – Almost every open-source tool ships an official ARM image and hundreds of step-by-step tutorials target the Pi first. It is your thing of course. People run DOOM on their Kitchen Robots.
- Power efficiency – Independent 2026 measurements put a headless Pi 5 (4 GB) at roughly 3 W idle, and an NVMe SSD on the M.2 HAT+ adds another 1–2 W. So the “4–5 W with an SSD” number I wrote last year still holds up.
- Community support – Community keeps building. I just copy them.
Ten projects follow, each solving a real pain point of mine, each fitting neatly inside Docker. I don’t say this is the best setup. But it is mine and I love them.
I’m using a Raspberry Pi 5 16GB with a 256GB SSD plugged in through a PCIe HAT and an active cooler. Well, go big or go home…
Table of contents
- How to use a Raspberry Pi in a homelab
- Which Raspberry Pi should you buy for a home server
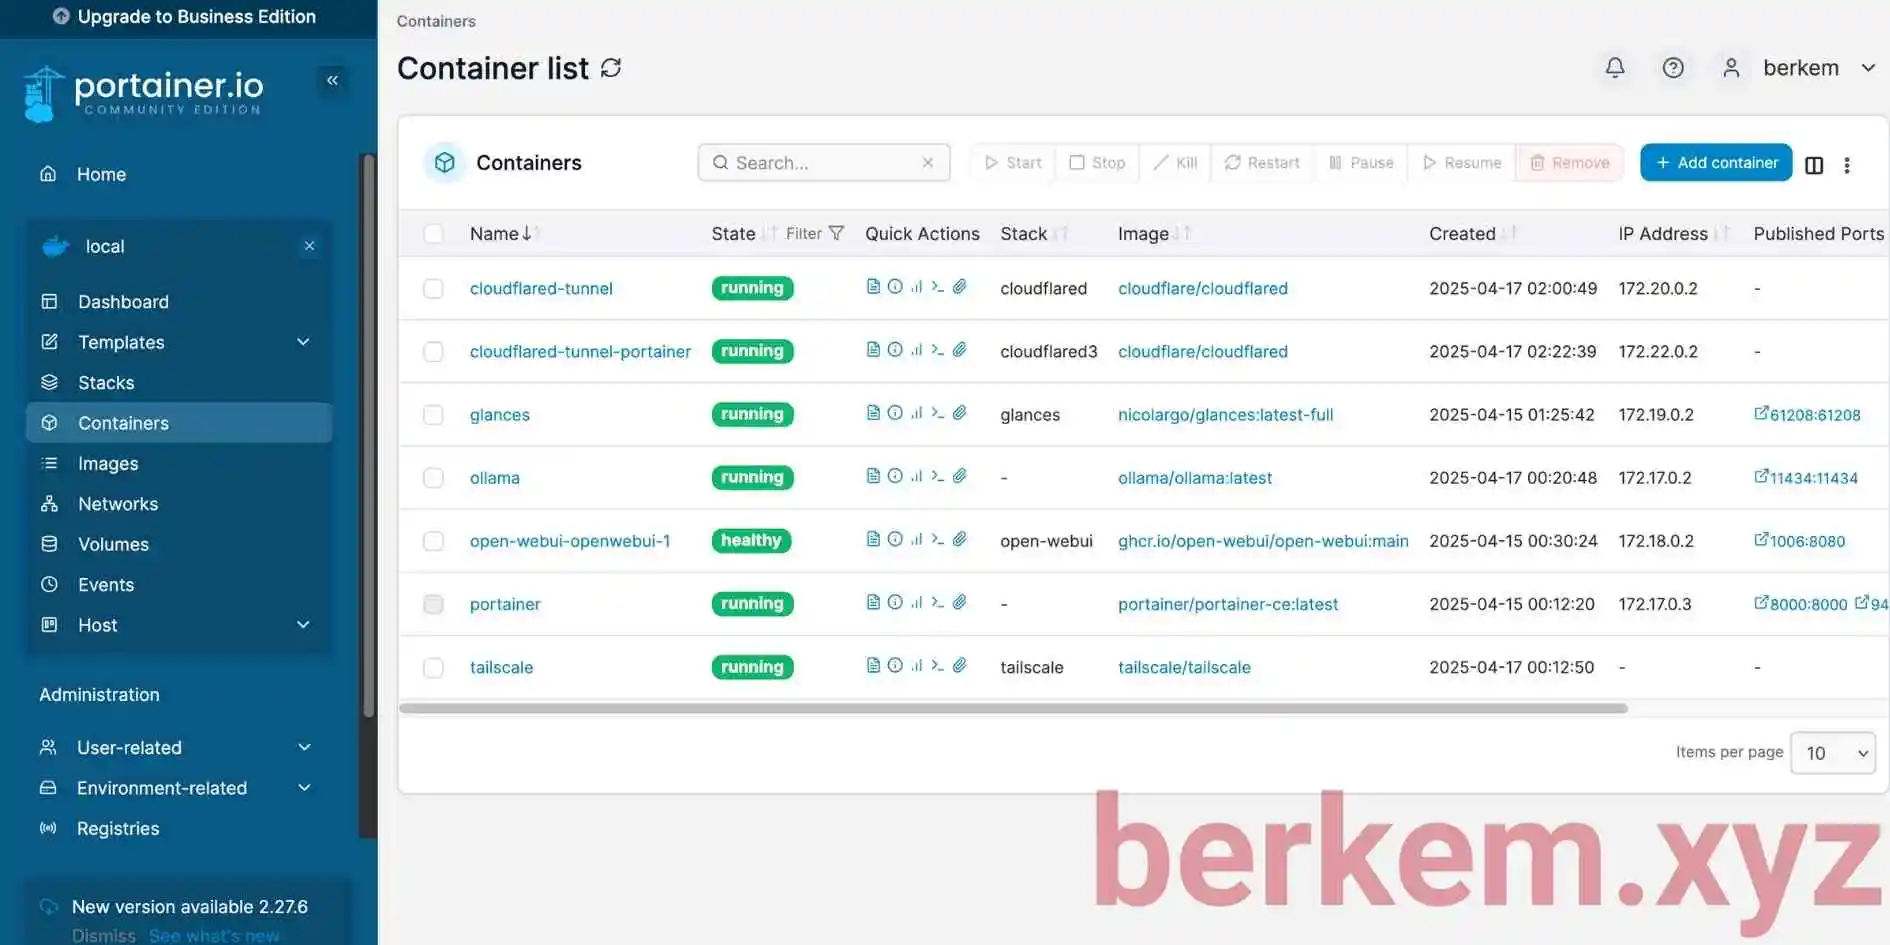
- Portainer – graphical Docker control
- Ollama + Open WebUI – private large language model server
- Pi-hole – network-wide ad and tracker blocking
- Tailscale – zero-config remote access
- Glances – live dashboard for system health
- Uptime Kuma – sleek uptime monitor
- Cloudflared Tunnel – secure public URLs
- Home Assistant – the smart home brain
- Immich – self-hosted photo library
- Vaultwarden – your own password vault
- Bonus roadmap
- A note on running AI locally
- Frequently asked questions
- What changed in this update
How to use a Raspberry Pi in a homelab
Most guides (including my old version of this one) skip straight to the shopping list without answering this. So let me actually answer it.
A homelab is just a computer in your house that runs services for you instead of renting them. That’s it. No rack, no blinking lights, no server room. If you have a Pi in a drawer running one thing you use every day, congratulations, you have a homelab. The word sounds grander than the reality, which is part of the fun.
A Raspberry Pi is good at being always-on, and bad at being fast. That one sentence decides everything else. The Pi 5 is a 2.4 GHz quad-core Arm chip that sips ~3 W and never makes a sound. It will happily sit there for months answering DNS queries, polling websites, receiving Zigbee events and holding a VPN tunnel open. What it will not do is anything bursty and heavy: 4K transcoding, big database rebuilds, compiling, a chunky LLM. Good home for lots of small patient services, bad home for one big impatient one.
Here’s how the pieces fit together, in the order I’d build them:
- Start with the OS. Flash 64-bit Raspberry Pi OS Lite with Raspberry Pi Imager, setting hostname, SSH and Wi-Fi during the imaging step. Since October 2025 the images are based on Debian 13 “Trixie” with the 6.12 LTS kernel. Use Lite, not Desktop. If you’re on Bookworm, Raspberry Pi does not recommend an in-place upgrade — reflashing is the sane path.
- Boot from an SSD, not an SD card. The single biggest reliability upgrade, because SD cards die from write cycles and everything here writes constantly. The official M.2 HAT+ starts at $12 and gives you a single-lane PCIe 2.0 slot (500 MB/s peak) for a 2230 or 2242 NVMe drive.
- Install Docker. One
curl -sSL https://get.docker.com | shand every project below becomes paste-and-go, with the bonus that a broken experiment never poisons the host. - Add a way in from outside. Tailscale for private access, Cloudflare Tunnel for public URLs. Both work behind CG-NAT, so you don’t touch your router.
- Then pick services. Start with one that solves an annoyance you have this week. A homelab you don’t use is just a warm brick.
- Only then, monitor and back up. Glances or Uptime Kuma, plus a cron job that tars your Docker volumes somewhere else. Ask me how I learned this one.
The thing nobody tells you: you will run out of patience before you run out of RAM. An 8 GB Pi 5 holds a dozen of these containers without breaking a sweat, because most idle at 50–250 MB. The real limit is how many services you’re willing to troubleshoot at 11pm.
Which Raspberry Pi should you buy for a home server
Right, the awkward part. Raspberry Pi prices went up three times in eight months — 1 December 2025, 2 February 2026, 1 April 2026 — and it wasn’t the board’s fault. LPDDR4 memory got extremely expensive because AI datacenter buildouts ate the fab capacity, and Raspberry Pi sells these close to cost. Going by their own announcements and product page:
| Board | Current price | Good for |
|---|---|---|
| Pi Zero 2 W | $15 | Pi-hole only. ~0.4 W idle. |
| Pi 5 / 1 GB | $45 | Pi-hole, Vaultwarden, Uptime Kuma. Nothing hungry. |
| Pi 5 / 2 GB | ~$65 | A few light containers. |
| Pi 5 / 4 GB | ~$110 | Comfortable general homelab. |
| Pi 5 / 8 GB | ~$175 | The sweet spot if you want Immich or Ollama. |
| Pi 5 / 16 GB | $305 | Only if you specifically need it. |
| Pi 500 | from $180 | Pi 5 in a keyboard, 8 GB only. Desktop, not server. |
| Compute Module 5 | from $67.50 | Embedded / carrier-board builds. |
A caveat on the table: the $45 1 GB and $305 16 GB figures are straight off raspberrypi.com. The 2 GB, 4 GB and 8 GB numbers I worked out from the published increments, so treat them as approximate — and retail listings have been running above MSRP anyway.
My honest recommendation: get the 8 GB Pi 5 if you can stomach it, the 4 GB if you can’t. 4 GB runs everything here except comfortable Immich machine learning and anything above a ~1B model. 16 GB is hard to justify at $305 unless you already know why you want it. I bought mine before the price rises and I’m not sure I’d repeat it today.
And no, a Raspberry Pi 6 is not coming to rescue you. In a May 2026 Reddit AMA, Eben Upton and the hardware and software CTOs said the Pi 6 won’t land before early 2028 and won’t have an onboard NPU. Same memory-cost reason. Whatever you buy now is the current generation for a good while.
When a Raspberry Pi is the wrong choice
I’d be doing you a disservice if I pretended these boards win every time. Buy an N100 or N150 mini PC instead if you want to:
- Transcode video (Jellyfin/Plex with anything other than direct play)
- Run virtual machines or Proxmox
- Run a serious Nextcloud or a large Immich library
- Use x86-only Docker images, of which there are still plenty
- Add more RAM later, which you cannot do on a Pi because it’s soldered on
An N100 mini PC ships complete — case, RAM, SSD, power supply — for roughly what a bare 16 GB Pi 5 costs, and it’s faster in more or less every benchmark including single-core. The trade is power: those boxes idle around 6–8 W and pull 25–30 W under load, versus the Pi’s ~3 W and ~9 W.
Stick with the Pi for silence, tiny size, GPIO pins, the HAT ecosystem, the enormous tutorial library, or because you just like them. That last one is completely valid and it’s mostly mine.
1. Portainer
Portainer is a lightweight web console that visualises containers, images, volumes and networks, letting you deploy full stacks from your browser.
- Needs about 200 MB RAM.
- Removes the need to SSH in for every Docker tweak.
- The Business Edition free tier covers 3 nodes, which is more than most hobby labs need.
Portainer runs as a container and talks to Docker through the host’s Unix socket, so actions take effect instantly.
What changed: the docs now point at the lts tag rather than latest, and port 9000 is the legacy plain-HTTP port — 9443 is the real one. Port 8000 is only needed for Edge agents. That free Business licence renews annually at no cost, but it’s non-commercial only.
Install
curl -sSL https://get.docker.com | sh

docker volume create portainer_data
docker run -d --name portainer \
  -p 8000:8000 -p 9443:9443 \
  --restart=always \
  -v /var/run/docker.sock:/var/run/docker.sock \
  -v portainer_data:/data \
  portainer/portainer-ce:lts
Open https://<Pi-IP>:9443, create an admin user and you are set. Your browser will complain about the self-signed certificate. That’s expected.
2. Ollama + Open WebUI
Ollama streams quantised open-source language models locally. Open WebUI adds a polished ChatGPT-style front-end and a REST API.
- All prompts stay on your own hardware, perfect for privacy.
- Zero cloud cost, zero rate limits, zero “you’ve hit your usage cap”.
Ollama loads the model and generates tokens. Open WebUI talks to Ollama’s API and serves a multi-user web client.
What changed, and this one matters: my old compose file was quietly broken. Open WebUI looks for Ollama on its own localhost by default, so you have to point it with OLLAMA_BASE_URL. It also needs its own volume or you lose chats and accounts on every update. And the documented tag is :main, not :latest. Sorry about that, and thanks to whoever was quietly suffering.
mkdir ollama && cd ollama
nano docker-compose.ymlservices:
ollama:
image: ollama/ollama:latest
container_name: ollama
restart: unless-stopped
ports: ["11434:11434"]
volumes: ["ollama:/root/.ollama"]
webui:
image: ghcr.io/open-webui/open-webui:main
container_name: open-webui
restart: unless-stopped
ports: ["3000:8080"]
environment:
- OLLAMA_BASE_URL=http://ollama:11434
volumes: ["open-webui:/app/backend/data"]
depends_on: [ollama]
volumes:
ollama:
open-webui:docker compose up -dVisit http://<Pi-IP>:3000, create the first account (it becomes the admin) and pull a model.
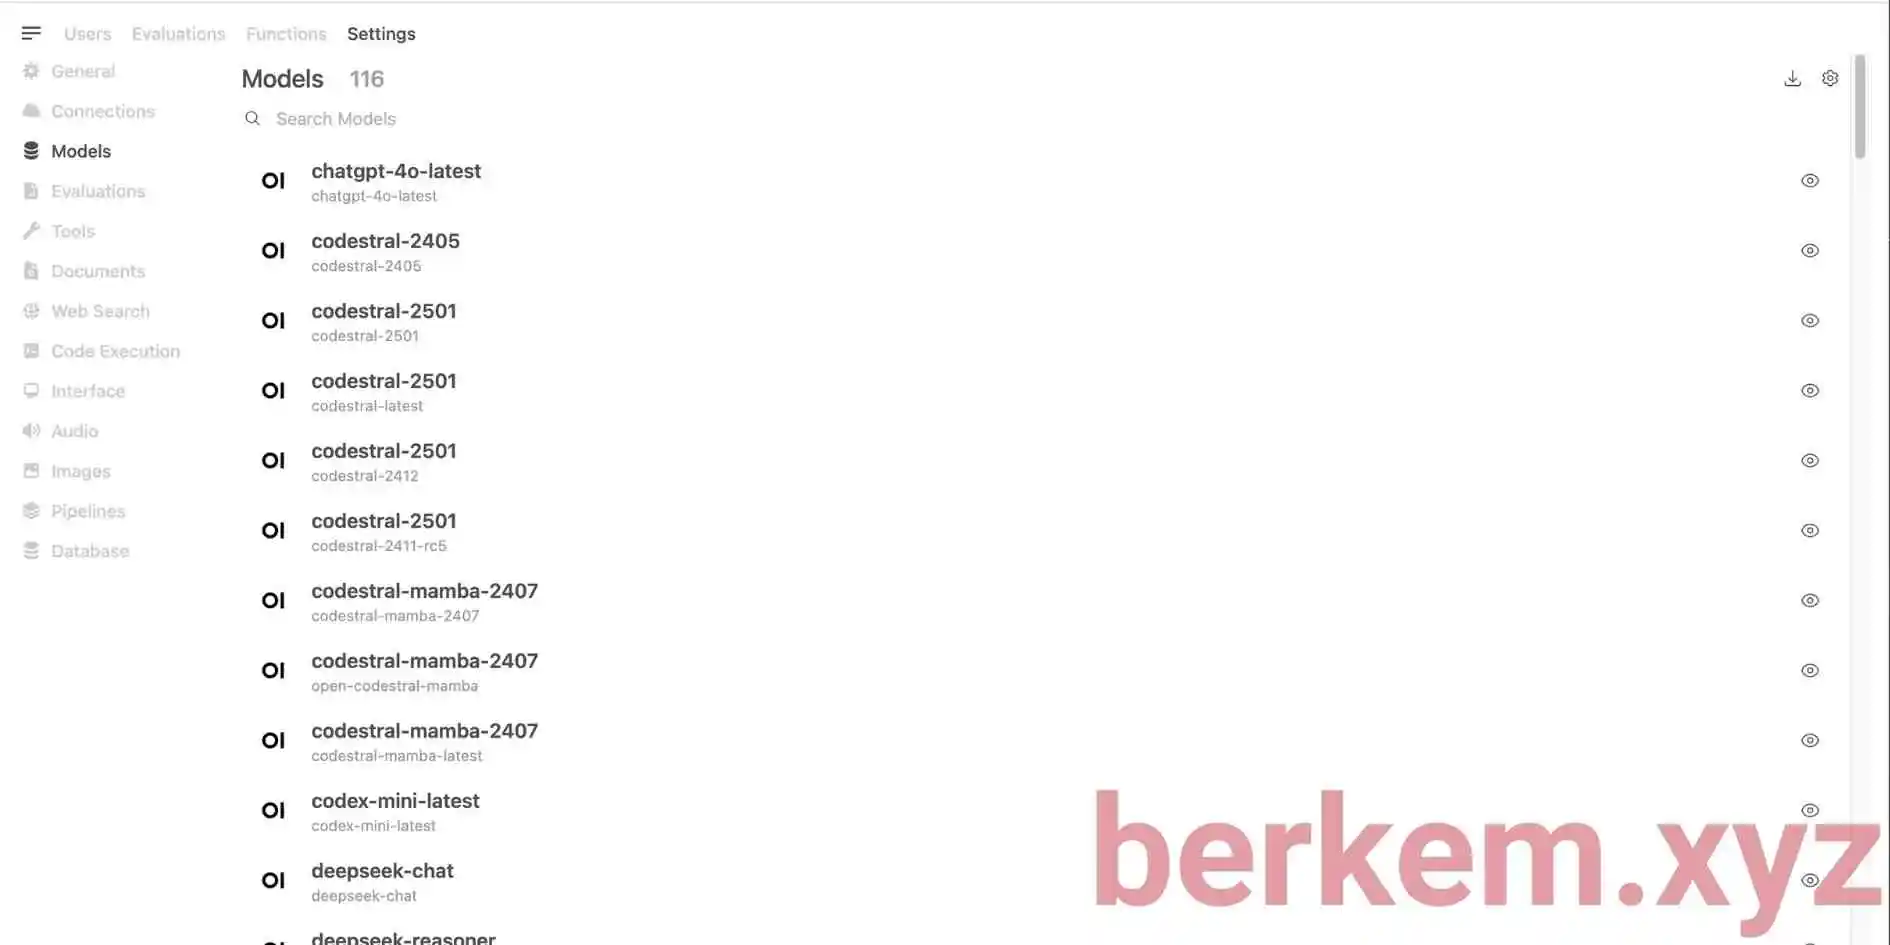
Be realistic about model size. You need a 64-bit OS, and 8 GB is the practical floor for anything above 1B parameters. Published 2026 benchmarks on a Pi 5 land around 18–22 tokens/sec for gemma3:1b and 8–11 tokens/sec for gemma3:4b. Those aren’t my numbers — they’re from other people’s benchmark posts — but they match the ballpark I see. A 1B model is genuinely fine for summarising and tagging. Anything bigger and you’re watching a progress bar with extra steps.
As you can see, I’m hoarding all the models you can imagine.
3. Pi-hole
You can check my better, detailed guide for installing Pi-hole on Raspberry Pi Zero 2W.
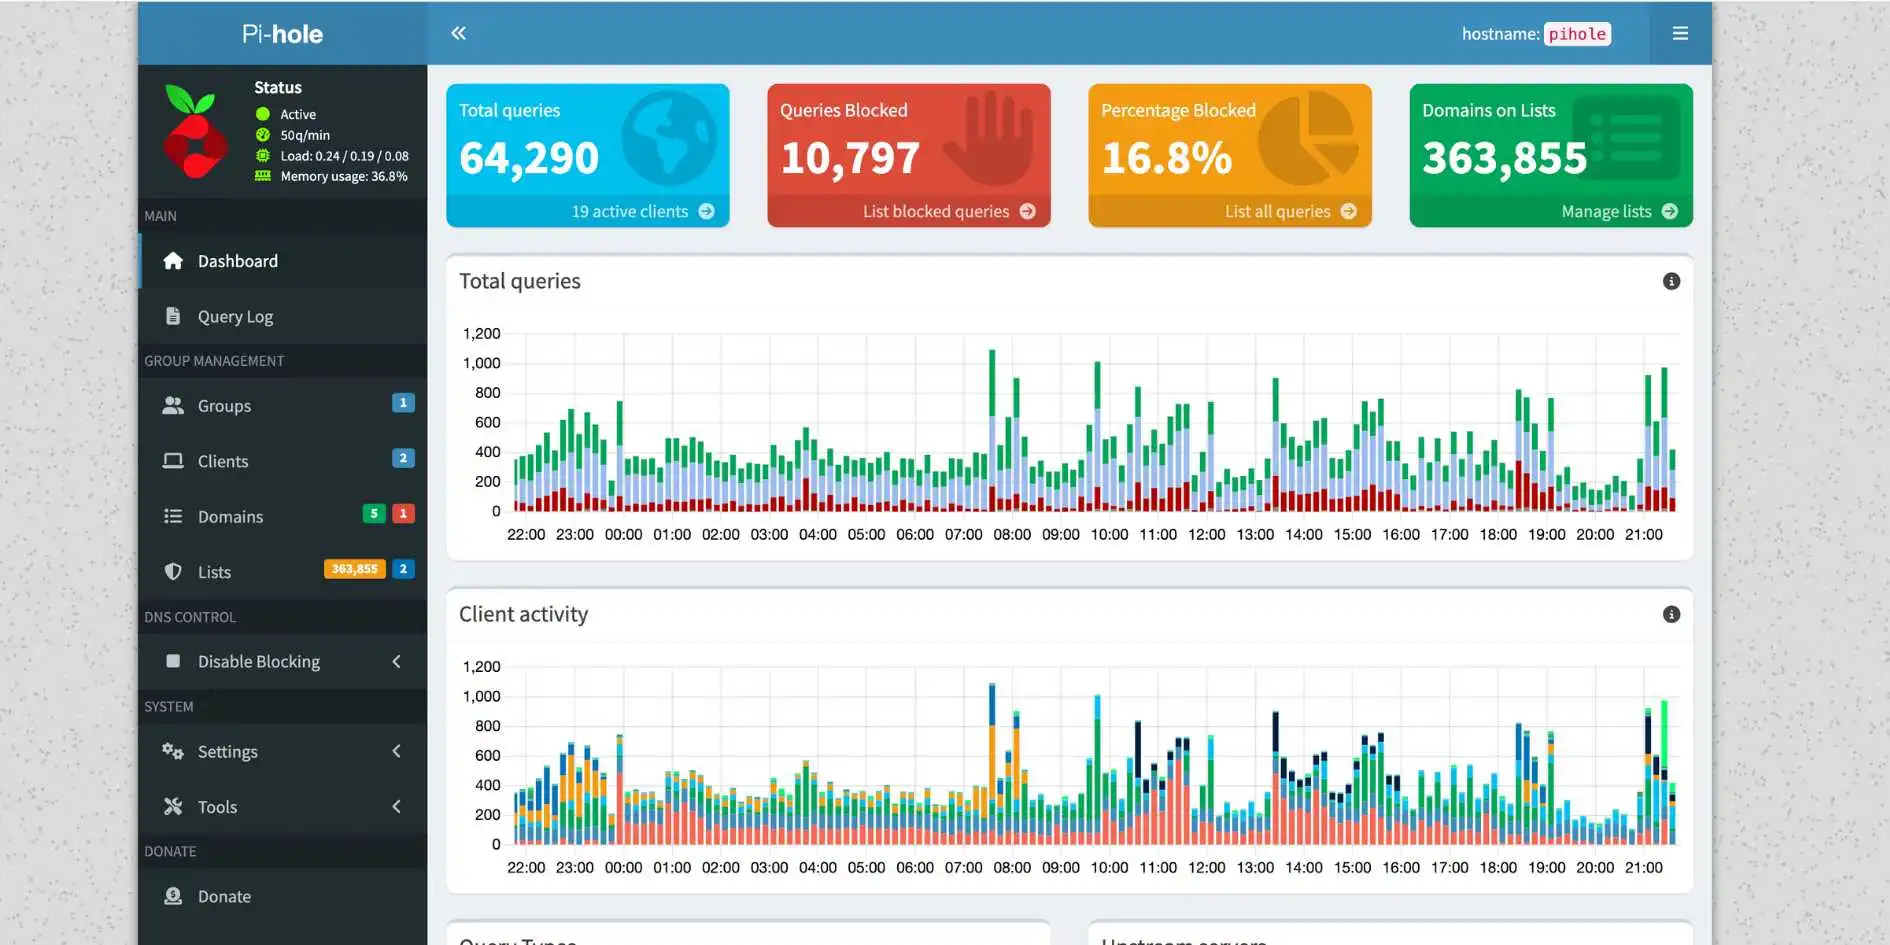
Pi-hole is a DNS sinkhole that blocks ads and trackers for every device on your network.
- Uses less than 100 MB RAM — ideal for an older Zero 2 W.
- A dedicated Pi keeps filtering while your main server reboots.
When a device requests a known ad domain, Pi-hole replies with a null address, so the ad never loads. Legitimate queries forward to the resolver you choose.
What changed: Pi-hole v6 landed in February 2025 and it is a genuine breaking change, so an older guide will lead you astray. lighttpd is gone, replaced by a web server embedded in pihole-FTL that binds port 80 and falls back to 8080. Environment variables all moved to the FTLCONF_ prefix. And once a v6 image touches your v5 config volume, the migration is one-way. The bare-metal installer is unchanged:
curl -sSL https://install.pi-hole.net | bashIf you’d rather run it in Docker alongside everything else:
services:
  pihole:
    image: pihole/pihole:latest
    container_name: pihole
    restart: unless-stopped
    ports:
      - "53:53/tcp"
      - "53:53/udp"
      - "8080:80/tcp"
    environment:
      TZ: 'Europe/London'
      FTLCONF_webserver_api_password: 'change-me'
      FTLCONF_dns_listeningMode: 'ALL'
    volumes:
      - './etc-pihole:/etc/pihole'
That FTLCONF_dns_listeningMode: 'ALL' line is required on Docker’s default bridge network, otherwise Pi-hole ignores queries from outside the container. Leave the password unset and you get a random one you then have to dig out of the logs.
Point your router’s DNS to the Pi-hole IP or let Pi-hole handle DHCP.
4. Tailscale
Tailscale builds a peer-to-peer WireGuard mesh so your devices talk as though they are on one LAN.
- Works behind CG-NAT without port forwarding. I cannot use port forwarding due to my ISP. So Tailscale is a must for me.
- Turn the Pi into an exit node and enjoy Pi-hole filtering on mobile data.
Clients authenticate via OAuth, exchange keys with coordination servers and then encrypt traffic end-to-end with WireGuard. The install one-liner is unchanged:
curl -fsSL https://tailscale.com/install.sh | sh
sudo tailscale up
Correction to my old version: I previously wrote sudo tailscale up --advertise-tags=raspi, which will just fail for you. Tags need the tag: prefix and must already exist in your tailnet policy file with a tagOwners entry. Define tag:server in the admin console first, then:
sudo tailscale login --advertise-tags=tag:serverTo make the Pi an exit node so your phone gets Pi-hole filtering on mobile data, enable IP forwarding on the host first, then:
sudo tailscale set --advertise-exit-node
sudo tailscale up
You still have to approve the exit node in the admin console afterwards, and I have absolutely forgotten this step more than once.
5. Glances
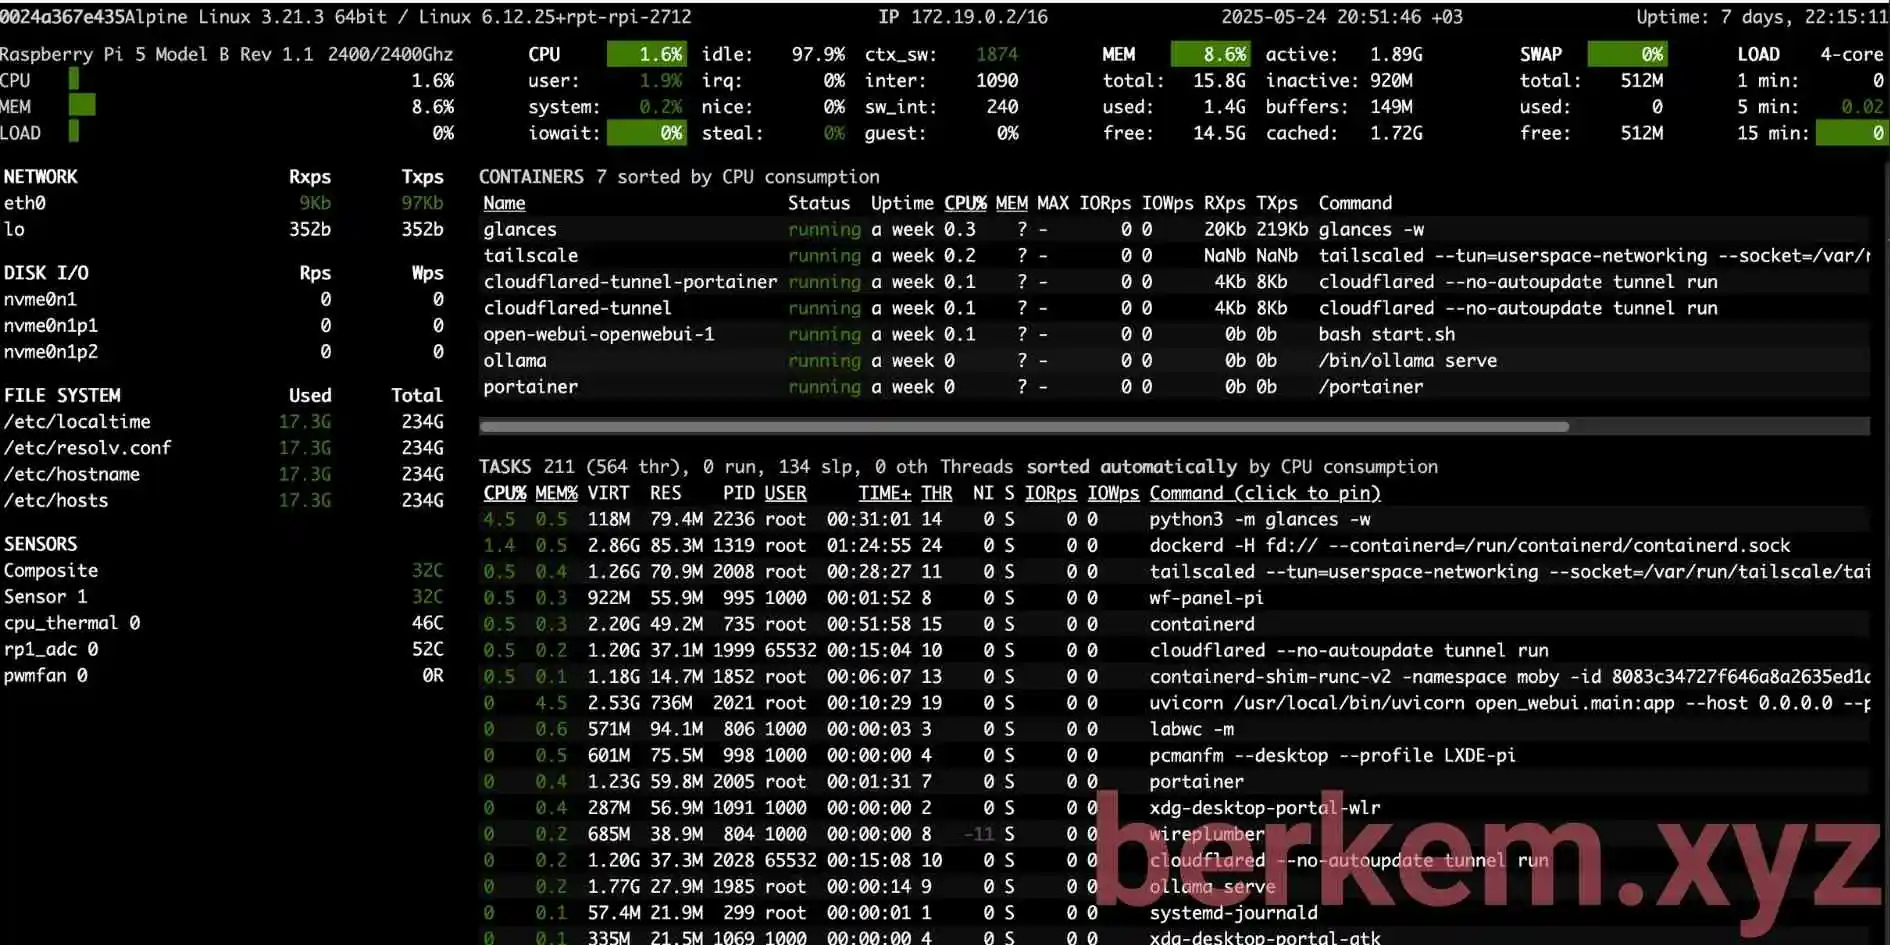
Glances is a Python-based system monitor that streams CPU, RAM, disk, network and Docker stats to a browser.
- One page shows temps and throttling — vital for a board that throttles when it gets warm.
- Optional REST API feeds Home Assistant dashboards.
Glances reads system metrics and Docker stats, aggregates them and serves an HTML page on port 61208.
What changed: the documented run command now sets web mode through the GLANCES_OPT environment variable rather than appending glances -w, and maps the 61208–61209 range. Keep the latest-full tag — plain latest is a minimal build with far fewer sensors. Glances 4.5.x also added an MCP server mode, so you can point an AI assistant at your Pi’s metrics. I’ve done nothing useful with that yet beyond asking a model why my CPU was warm.
docker run -d --restart always \
  --name glances \
  -p 61208-61209:61208-61209 \
  -e TZ="Europe/London" \
  -e GLANCES_OPT="-w" \
  -v /var/run/docker.sock:/var/run/docker.sock:ro \
  --pid host \
  nicolargo/glances:latest-full
Open http://<Pi-IP>:61208 in any browser.
6. Uptime Kuma
Uptime Kuma is an open-source monitor that tracks HTTP, ping, DNS and more, with alerts via Telegram, Slack or email.
- Lightweight enough to sit alongside everything else on one board.
- One board can watch your ISP, smart-home hubs and public sites.
Kuma polls targets on a schedule, saves results in SQLite and renders clean charts through a Vue interface.
Two corrections here. First, I described the backend as Go last time. It isn’t — Uptime Kuma is Node.js with a Vue 3 front end, and I’m not sure where I got that. Second, version 2 is now stable (2.4.0 as of May 2026) and the project marks latest as deprecated. Pin the major version instead:
docker run -d --restart=always \
  -p 3001:3001 -v uptime-kuma:/app/data \
  --name uptime-kuma \
  louislam/uptime-kuma:2
Visit http://<Pi-IP>:3001, add monitors and configure notifications. Point one of them at your own Pi-hole — a homelab that can’t tell you it’s down isn’t monitoring, it’s optimism.
7. Cloudflared Tunnel
Cloudflared creates a tunnel from your Pi to Cloudflare’s edge so any local service becomes reachable at a secure public URL.
- Perfect if your ISP blocks inbound ports or uses CG-NAT.
- Free HTTPS, CDN and WAF without extra setup.
Cloudflared holds a persistent outbound connection to the nearest Cloudflare point of presence. External requests hit the edge and proxy through the tunnel to your local port. Nothing inbound is ever opened on your router.
What changed: my old command assumed a locally-managed tunnel with credential files, which doesn’t work in a bare container. The modern flow is a remotely-managed tunnel: create it in the Zero Trust dashboard, copy the token, hand it to the container. Hostnames, routes and certificates all live in the dashboard.
Create the tunnel and its public hostname in Zero Trust → Networks → Tunnels, then:
docker run -d --restart=always \
  --name cloudflared \
  cloudflare/cloudflared:latest \
  tunnel --no-autoupdate run --token <YOUR_TUNNEL_TOKEN>
If you prefer compose and an .env file, pass it as the TUNNEL_TOKEN environment variable with command: tunnel run. I walk through exactly that pattern in my n8n on Raspberry Pi guide, and it’s the setup I actually run.
One warning: this puts a service on the public internet. Put Cloudflare Access in front of anything that isn’t meant for strangers.
8. Home Assistant
Home Assistant is the open-source hub that ties every smart device in your house together — lights, sensors, vacuums, energy meters, the lot — and automates them locally without any of it phoning home.
- Local control means your automations keep working when your internet doesn’t.
- Every smart device you buy comes with its own app and its own cloud; this collapses all of it into one dashboard.
- Officially supported on Pi 4 (2 GB+) and Pi 5.
It’s also the natural companion to Glances, since you can pull your Pi’s own metrics in as sensors. There are two ways to run it and the choice matters:
Home Assistant OS is what the project recommends for most people. It’s a whole operating system — flash it with Raspberry Pi Imager and the Pi does nothing else, ever. You get the Supervisor, add-ons and one-click updates. If Home Assistant is the point of your Pi, do this.
Home Assistant Container is the one you want if the Pi already runs the other nine projects here. No Supervisor, no add-ons, but it lives happily beside your other containers:
services:
  homeassistant:
    container_name: homeassistant
    image: "ghcr.io/home-assistant/home-assistant:stable"
    restart: unless-stopped
    privileged: true
    network_mode: host
    environment:
      TZ: "Europe/London"
    volumes:
      - ./ha-config:/config
      - /etc/localtime:/etc/localtime:ro
      - /run/dbus:/run/dbus:ro
Host networking and the dbus mount are there so device discovery and Bluetooth actually work. Then open http://<Pi-IP>:8123.
If you want a dedicated board for this, honestly buy a second Pi. Home Assistant is the one service where I’d rather not share.
9. Immich
Immich is a self-hosted photo and video library with a mobile app that backs up your camera roll automatically, plus face recognition and semantic search. It is the closest thing to Google Photos that you can actually own.
- The mobile apps are genuinely good, which is rare in self-hosted land.
- Face grouping, map view, albums, sharing — the features you’d actually miss.
- Machine learning runs locally, so nobody’s model is training on your kids.
Fair warning: Immich is the heaviest thing in this post by a wide margin. It’s a stack, not a container — server, machine learning service, Redis and Postgres. The 2026 consensus is that a Pi 5 with 8 GB is the sensible minimum, and it does work including AI search and face recognition, but ML jobs run noticeably slower than on x86. Importing a decade of photos takes a while.
Install follows the official compose flow:
mkdir ./immich-app && cd ./immich-app
wget -O docker-compose.yml https://github.com/immich-app/immich/releases/latest/download/docker-compose.yml
wget -O .env https://github.com/immich-app/immich/releases/latest/download/example.env
Edit .env to set UPLOAD_LOCATION, change DB_PASSWORD from the default and uncomment TZ. Then docker compose up -d, and open http://<Pi-IP>:2283 to create the admin account.
Two things the docs are firm about: you need Docker Engine v25 or newer, and the database must not live on a network share. Put it on the SSD. Also, Immich is not a backup, it’s a library. Back up UPLOAD_LOCATION somewhere else.
10. Vaultwarden
Vaultwarden is an unofficial, lightweight server implementation of the Bitwarden API, written in Rust. All the official Bitwarden apps and browser extensions talk to it, so you get a real password manager while owning the vault.
- Tiny. A Rust binary that idles in tens of megabytes — the best value-per-watt service on this list.
- Works with the official Bitwarden clients on every platform.
- Features that cost money on Bitwarden’s hosted plan are just… there.
Your password vault is the one piece of data where “I’d rather it be on my hardware” is completely rational.
docker run -d --name vaultwarden \
  --restart=always \
  -v /vw-data/:/data/ \
  -p 8081:80 \
  vaultwarden/server:latest
ARM64 images are published, so it runs on a Pi without fiddling. I’ve mapped it to 8081 so it doesn’t collide with Pi-hole’s web port.
This one genuinely needs HTTPS. Browser extensions won’t talk to a plain-HTTP vault on anything but localhost, and you shouldn’t want them to. Put it behind Cloudflare Tunnel (project 7) or keep it Tailscale-only (project 4). And back up /vw-data/, because a password vault you can’t restore is an elaborate way to lose all your passwords.
Bonus roadmap
I plan to install a couple of other things on my main Raspberry Pi.
- FreshRSS – minimalist self-hosted RSS reader.
- Karakeep – AI-powered bookmark manager. I wrote a detailed guide on setting it up!
- n8n – workflow automation platform. Check out my setup guide with Cloudflare Tunnel.
- Beszel – a very light monitoring dashboard getting a lot of love lately. If Glances feels like too much, this is the other direction.
- Paperless-ngx – scan a document, never think about the paper again.
- Jellyfin – with the earlier caveat: direct play is fine on a Pi 5, transcoding is not.
A note on running AI locally
While I love tinkering with local AI on my Pi, let’s be real — running a full coding agent locally is way too demanding for this board. What the Pi is good for is the small, boring, useful end: summarising an RSS feed, tagging bookmarks, classifying something on a schedule. A 1B model doing a small job every hour beats a 7B model doing one impressive thing very slowly.
That said, the community never ceases to amaze me. There are people out there running coding agents on ten-year-old Android phones. If that’s not the spirit of the homelab community, I don’t know what is.
Frequently asked questions
Can one Raspberry Pi run all ten of these? Most of them, yes. A Pi 5 with 8 GB handles Portainer, Pi-hole, Tailscale, Glances, Uptime Kuma, Cloudflared and Vaultwarden at once without noticing — those seven sit comfortably under 1 GB. Add Home Assistant and you’re fine. Add Immich and Ollama on top and you’re pushing it.
What’s the best Raspberry Pi for a home server right now? The 8 GB Pi 5, if the price doesn’t put you off. The 4 GB is the value pick. Below 2 GB, treat it as a single-purpose box.
Is a Raspberry Pi still worth it in 2026? For low-power, always-on, small services: yes, easily. For raw throughput, an N100 mini PC is now the better buy and it’s not close. The memory price situation narrowed the Pi’s advantage down to power draw, size, silence and the ecosystem.
Do I need to boot from an SSD? Not strictly, but you should. Every service here writes constantly and SD cards wear out. The M.2 HAT+ is $12 and it’s the best money in this whole build.
Should I use Pi-hole or AdGuard Home? Either. Pi-hole has the bigger community and more tutorials; AdGuard Home has DoH/DoT built in. I use Pi-hole because I already knew it, which is the most honest reason anyone picks anything.
What changed in this update
Full disclosure on July 2026’s revisions, since a lot of it was me being wrong:
- Fixed the Ollama + Open WebUI compose file — it was missing
OLLAMA_BASE_URLand the Open WebUI volume, so it never worked as a two-container setup. - Fixed the Tailscale tag command, the Uptime Kuma description (Node.js, not Go) and the Cloudflared run command, and moved Portainer, Glances and Uptime Kuma onto their currently documented image tags.
- Added Pi-hole v6 breaking changes, which catch out anyone following an older guide.
- Added three projects: Home Assistant, Immich and Vaultwarden.
- Added hardware sections on the 2026 price rises, which Pi to buy, and when to buy something else.
Let me know if this works for you!
Cheers,
Berkem


